Astro Babys Supertune Guide for the Skywatcher EQ6 and Orion Atlas
Supertuning the Synta / Skywatcher EQ6 / Orion Atlas


This procedure is an addendum to the main strip down guide located HERE and will guide you towards Supertuning the mount to get better results. This guide needs to be read in conjunction with the main strip down guide and shows how to get better tuning with the RA and DEC worm gears by using additional shims to set the worm gear to worm roller more accurately.

This guide also includes a shim calculator so you can automatically calculate the shim sizes required when rebuilding.

Notes:
I am going to break with convention for supertuning in this guide and NOT replace the main bearings. Much discussion about these has taken place in various guides and forums but the fact is the main bearings are perfectly adequately engineered for a mount like the EQ6. The only bearings I changed in this guide were worm roller end shaft bearings because these are generally pretty poor quality from the factory. The other bearings are more than adequate as the mount does not need high speed bearings and ceramic bearings are prone to potential problems in cold weather.

The supertuning element is concerned with the setting of more accurate worm gear alignment. Its assumed if you are carrying out this process you will have carried out all steps for improving the mount in the strip down and rebuild guide with regards to cleaning and deburring components and replacing the factory lubricant with a lithium type grease.

The EQ6 mount used for this guide was a new model and was probably manufactured around 2009. The overall machining was far better than on the earlier mount used for the strip down guide and engineering tolerances were significantly better. The mount showed a better quality lubrication although it was almost dry in places and a generally 'cleaner' level of engineering with none of the swarf and drek found in the earlier generation Synta mounts I have disassembled.

Replacement parts required for this guide:
The only parts acquired for this guide were the worm roller end shaft bearings and some additional shims. Details of these are as follows along with a complete bearing list if you find any of your bearings have been damaged or are unfit for use.

Shims
Pack of Delrin shims in assorted sizes. These can be acquired from;


Bearings
These are fairly standard bearings and can be acquired almost anywhere. Mine were acquired from ebay relatively cheaply. A complete list is supplied for your information although for tuning only the worm roller end shaft bearings are worth replacing in my opinion. There are very many manufacturers of bearings, SKF bearings are relatively common in the market place and these were used. Other manufacturers part codes may differ slightly - if in doubt check with your supplier.

Qty Application Manufacturer SKF Product Code Replaced in this Guide
4 Worm Roller End Shaft Bearings  SKF  608 2RSH  YES 
6 Main Shaft Bearings (3 per axis)  SKF  6008 2RSH  NO 
1 DEC Shaft Taper Bearing  SKF  30206 J2/Q  NO 
1 RA Shaft Taper Bearing  SKF  32208 J2/Q  NO 
 

Tools required for this guide:
In addition to the tools required to do the mount strip down for supertuning you will also require the use of a digital caliper. These can be acquired readily at reasonable prices from sources such as ebay fro around £20.

Shim Setting/Calculations
Equipment ready for EQ6 SuperTune The upgraded EQ6 bearings Measuring the worm face to mount face of the EQ6
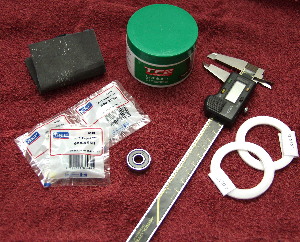
Here is all the equipment ready for work. Emery cloth, replacement bearings, Delrin shims, digital caliper and of course lithium grease. 
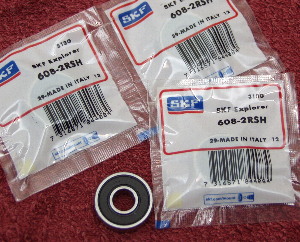
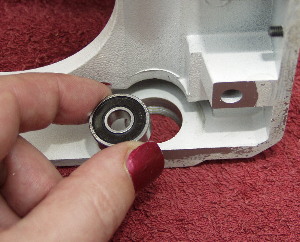
This is a picture of the replacement worm roller end shaft bearings. These are superior quality to the ones that the factory fit to the mount.
Note: These are supplied un-lubricated so require the seals to be gently pried away with a very thin screwdriver and the bearing to be lubricated with the lithium grease before replacing the seals.
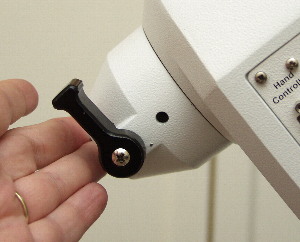
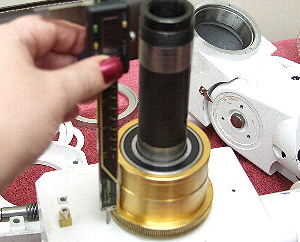
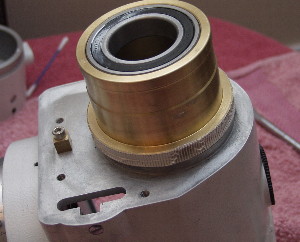
During rebuilding of the DEC and RA axis before reassembly commences place the original factory teflon washer onto the face plate and then place the worm gear onto the main shaft as in this picture. Note: This is the same procedure for both the DEC and RA axis. Measure the distance from the top of the worms gears face to the face of the mount.....
     
Measuring the worm face to mount face - data item A Measuring the worm gear teeth depth for the EQ6 - Data Item B Calculation required for EQ6 shim sizing
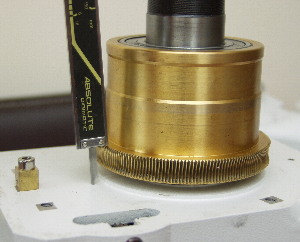
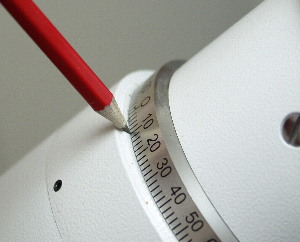
......Here is the measurement in close up. From the top of the gear teeth of the worm bearing to the face of the mount. Obviously when you do this the digital caliper must be square to all faces.
Make a note of this measurement which we shall call 'A'
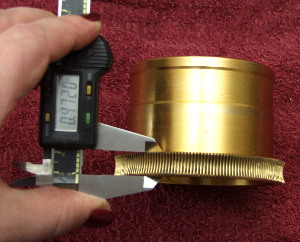
Now measure the depth of the worm gears machined teeth and make a note - this is 'B' Measurements 'A' and 'B' are used to calculate the centre of the worm gears teeth from the mount face. This is achieved using the simple calculation above. The result of this calculation is measurement 'F'.

You can however simply enter your measurements into the calculator on this page and it will carry out the shim size calculation for you.
     
Replacing the worm roller end shaft washer on the EQ6  Measuring the end float washer to worm carrier face on the EQ6  Measuring the worm end roller on the EQ6 
Replace the worm roller end shaft bearing into the worm carrier having first made sure it is suitably lubricated with lithium grease. 
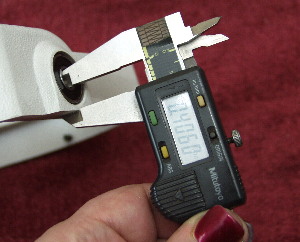
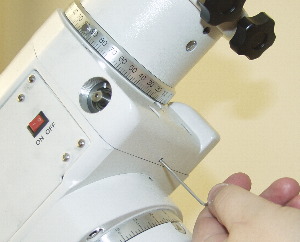
Measure the distance between the edge of the worm carrier and the inside of the worm shaft end bearing. This will be a measurement 'C' make a note of this. 
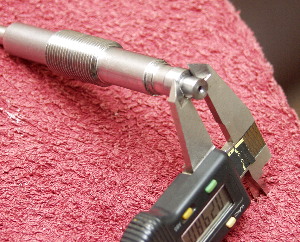
Finally measure the width of the worm roller end shaft, this will be measurement 'D'. Make a note of this.
     
Calculation required for EQ6 shim sizing
Measurement Values
A
B
C
D
E
F
SHIM
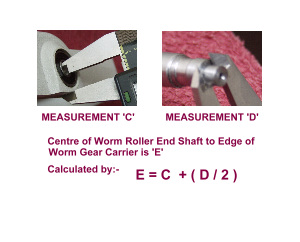
Measurements 'C' and 'D' are used to calculate the centre of the worm rollers teeth from the base of the worm carrier. This is achieved using the simple calculation above. The result of this calculation is measurement 'E'.

You can however simply enter your measurements into the calculator on this page and it will carry out the shim size calculation for you.
Now Simply Subtract F from E and you have the shim size required.

Note: Sample data from 2 other EQ6 Mounts is given in the tables below to give you some idea of what sorts of numbers you should be seeing.

All of these calculations are done for you by just entering your A, B, C and D measurements into the following table
Enter your A, B, C, D measurements into this table to calculate the correct shim to place between the worm gear and the bearing face.

Note: When you click SUBMIT the page will reload and you will need to scroll down to the table to see the result.
     
Sample EQ6 Shim Values
A 0.780
B 0.470
C 0.391
D 0.310
E 0.546
F 0.545
Shim Size 0.001
 RESULT = No shim required
Sample EQ6 Shim Values
A 0.776
B 0.461
C 0.390
D 0.311
E 0.546
F 0.540
Shim Size 0.000
 RESULT = No shim required
Sample EQ6 Shim Values
A 0.775
B 0.476
C 0.390
D 0.313
E 0.547
F 0.537
Shim Size 0.010
 RESULT = .010 Shim Required
To provide you with sample data these are the measurements from an EQ6 DEC gear. Tolerances are fine so no shim is required. Here is another sample from my own EQ6 RA gear. As you can see tolerances are fine and no shim is required. Finally here is the data from an EQ6 RA gear which has been poorly set up from the factory. A .010 shim is required.
     
Reassembly with shims on the EQ6 Tuning the worm gear on the EQ6
Replace the gear ready for assembly with the correct sized shim washer from your calculations.
Note: If the original teflon washer from the factory is badly worn you can replace it with a similar sized washer OR simply carry out your measurements with NO washer in place and then use the appropriate sized Delrin shim washer from the measurements and calculations
POINTS ARISING.... You MAY find after rebuilding that the DEC is either loose and can be pushed up and down OR that there is a gap between the DEC scale/collar and the mount. This is a possible sign that you either have too much shim or not enough. Read the notes below for more detail.You should also refer to the EQ6 Case Study guide for shim washer considerations at the bottom of the page HERE Finally you need to carry out worm tuning as per the EQ6 Strip Down and Rebuild Guide HERE


Observations:
The EQ6 used to create this guide actually needed no shims applied to the RA axis as it was perfectly well set-up, the large amount of play in the RA axis was tuned out just through a rebuild and relubrication and careful setting of the worm gear during the worm tuning stage.


The DEC axis however was rather challenging and this is described with pictures below.....
Gap appearing in DEC collar
The DEC shim size for the mount rebuilt in this guide was actually a negative number. Even the factory shim was (at least by calculation) too large. The mount was originally rebuilt with no shim at all however this produced a problem whereby pressing on the weight bar collar as in the picture above..... Produced a noticeable rise in the DEC axis visible by a gap appearing in the area indicated by the point of the pencil in the photograph.
Successive rebuilding of the DEC axis produced variable results including a .010 space opening in the DEC collar where the pencil is pointing.
In the end I settled for a .010 shim which although technically too large did, with sufficient tuning produced a mount which would run without motor stall or play.
 
What this problem indicated to me was that to some extent these mounts need a sympathetic tune rather than a strictly scientific one. It can often be an art more than a science and requires a certain 'feel' to weigh up whether a shim is too much or too little. If you are facing this kind of problem after supertuning read the shim washer considerations at the end of the EQ6 Case Study HERE

The mount used in this guide was over time tuned to a much higher degree than when it left the factory and after the stages described in the EQ6 strip down and rebuild guide and the supertune guide it operates far more quietly with no play in either axis.


Thanks
My thanks to all the people who have encouraged me to create this guide and who have offered help and support in the making of this guide.
You know who you are and you have my gratitude.
 
Back to the Skywatcher EQ6/Orion Atlas Strip Down and Rebuild Index