Your almost there....the mount is now calibrated and
now we are ready to set up and align on Polaris and thus the North Celestial
Pole or NCP.
If
you have carried out the previous steps this next section tells you how to set
up the scope to align on Polaris ready for observing.
If you want to go back to the previous pages
click HERE for
aligning the reticule and HERE for setting up the polar scope
setting circles.
|
| ALIGNING TO POLARIS AND THE NCP |
|
|
Setting up the
mount
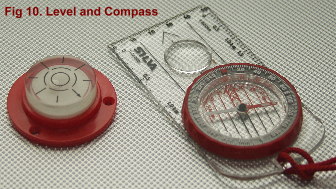
Ideally for this stage you will have a bubble level or spirit level
and for the complete novice a compass is useful. A typical bubble level and
compass of the type I use are shown in Fig 10.
OK from the previous steps you have all of the data calibrated into
the setting circles and can align to Polaris accurately using the Polar scope
and the polar scopes setting circles.
Before you do that you need to make sure your mount is level ( that's
what the bubble level is for ) and that you are pointed North ( that's what the
compass is for ) don't worry - you don't have to be too accurate on this
step.
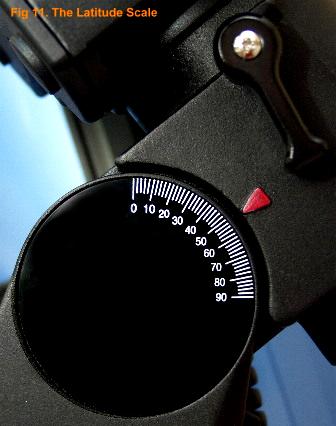
Once the mount is level and facing north
you need to set your Latitude on the Latitude scale. This is shown in Fig 11. I
am located at Latitude 51 degrees. You will need to locate your own latitude
for your location. This is easily available from Google Earth or almost any
on-line streetmap. Elevate your mount using the altitude adjustment bolts until
the correct Latitude for your location is showing. Again this doesn't have to
be too accurate.
NOTE:
When you adjust the altitude or azimuth bolts you must remember to screw the
opposing bolts in the opposite direction until alignment is complete and then
lock them up against one another to maintain the alignment.
Aligning to
Polaris
We are almost ready now. Make sure both your RA Index Scale and the
Date Circle are set against their respective Zero marks ( e.g. RA Index Scale
is set to 0 against the RA Index Mark and Date Circle is set to 0 against the
Date/Longitude Index Mark. ). Make sure the RA scale is locked using the RA
Index Scale Lock screw. Now rotate the RA axis of the scope until the date on
the Date Circle and time on the RA Index Scale align for the time you are
observing. As you rotate around the RA axis only the date circle will move. the
RA scale will be locked.
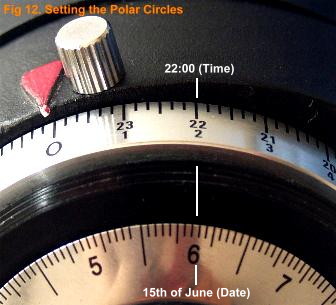
For example -
assume you are out and wish to align to Polaris. The date is the 15th of June
and the time is 22:00 GMT ( or whichever time-zone you set your mounts transit
time for ). Make sure the RA scale and Time Date scale are at their respective
zeros ( see previous page
), lock the RA scale and rotate the RA axis ( NOT THE SCALE ) until 15th June
is level with 22:00 - see Fig 12 for how the scales will look. Now lock the RA
Axis.
Don't worry about the scope ( if its
attached and now pointing in an odd direction - this is only to align the mount
).
Now with the scales set at your correct
date/time and the latitude set correctly and the polar scope pointing north you
should be able to locate Polaris.
Look through your polar scope and centre Polaris in the small circle
marked 'Polaris' using your altitude and azimuth bolts.
Your done. You have successfully set up the mount,
located Polaris and fixed it and thus the NCP.
You can monitor how close the tracking is by looking at Polaris and
watching it move. If everything has been set correctly you will see Polaris
move slowly around the edge of the larger circle that surrounds the
NCP.
|
|
|
Questions and
Answers on this guide - the following are common questions I have been
asked
Q How often do I need to set-up the polarscope setting
circles ? It depends on what level of
accuracy you want. The polar setting circles if done accurately should get you
within 5-6 arc minutes of the NCP. Thats plenty accurate enough for observing
and short exposure photography. The polarscope circles are not perfect
instruments and consequently some error will creep in. Normally I would check a
transit time for the time and date when I want to set-up so its as accurate as
possible.
Q Do I need all of this just to observe ?
No, and in fact before I upgraded I would just set my
latitude for 51 ( the latitude where I live ), Set the mounts Declination at 90
degrees and point the mount North. Get Polaris into the centre of the view by
adjusting the alt-azimuth and go with that. Its good enough for most observing
I found.
Q
What are the star patterns for in the reticule ?
Apart from Octans which is used for alignment to the
South Celestial Pole
( SCP ) the other two constellations are there for rough
alignment. You can match the view you are seeing to the constellations shown in
the polarscopes reticule as a rough guide. You don't actually see the
constellations IN the polarscope - you have to look at the polarscope and the
sky and compare the two. Personally I find it easier to do the precision type
set-up explained in this guide.
Can I use this
guide to set up mounts other than the HEQ5 ? I can't say for sure.
The HEQ5 and EQ6 mounts are very similar, the Orion equivalents are identical.
I know from reading the manual the EQ3-2 is also very similar to the HEQ5 in
basic operation. The main difference is a simplified reticule and the fact that
the EQ3-2 has no reticule adjustment screws but relies on the polarscope being
adjusted by larger external screws rather like a finderscope. The basic
principles are the same but obviously there are differences in the way the
mounts are assembled and the location of their various
controls.
|
| |
|
|
| Return to Astro-Baby Home Page
|
Reference Sources:
HEQ5 and EQ6 Manual from Sky-Watcher located at
http://www.opticalvision.co.uk/manuals.asp
Special
Thanks to Steppenwolf at the Chanctonbury Observatory for his help in compiling
this.
|