 |
OK you've aligned the reticule and now your ready to
set the polar scope up to locate Polaris. Heres how....
If you want to go back to the previous page click
Take me back to align the
reticule
|
| SETTING THE SCALES |
 |
The polar scope and its setting scales is a simple
astronomical calculator which allows you to fix the position of Polaris and
therefore the North Celestial Pole ( NCP ). There are three elements to the
calculator; the reticule, the RA index scale and the date circle. For now we
will ignore the longitude scale which will only be of use if you live in a
time-zone other than GMT.
Now Polaris
isn't actually AT the NCP but its near it. Polaris 'orbits' the NCP - thats
what the circle around the NCP mark is. The small circle marked 'Polaris' is
where you will place Polaris once the mount is aligned.
What we will do here is line the scope
up at a fixed point in time when we know where Polaris will be. That will allow
you to use the scales to know where Polaris is at ANY date and time and
therefore be able to align the mount to the NCP
Set Polaris to Transit
Point
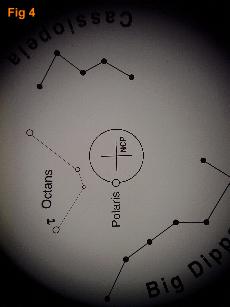
The first thing
you need to do is release the RA lock, look through the polarscope ( focus it
as you require ) and turn the RA axis until Polaris is at the bottom of the
view ( see fig 4 ). Now lock the RA down.
This is the point when Polaris is highest in the sky and its called a
'transit'. You may wonder why its at the bottom - well a polarscope is like any
telescope and shows things upside down unless corrected with a correcting
prism. The polarscope doesn't have a correcting prism so what your seeing is
wrong way up. |
|
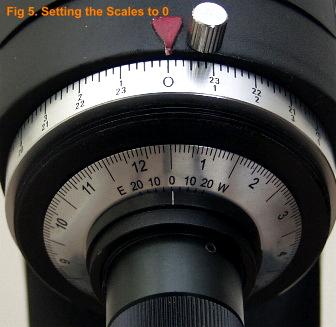 |
Set scales to ZERO
With the reticule showing Polaris at the bottom and the RA
locked turn the RA Index Scale round until 0 is under the RA Index
Mark.
Now turn the Date Circle until the longitude scale also shows 0
against the RA Index Mark. You should find that the Date/Longitude Index Mark
is also in line if the mount is new. If not ignore it at this point and carry
on. Your settings should look like Fig 5
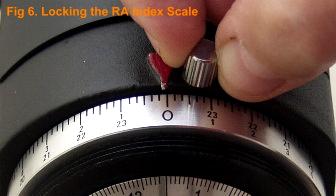
Now with the RA scale at 0 against its
index mark lock the RA scale using the RA Index Scale Lock as shown in Fig
6.
Setting the date and
time
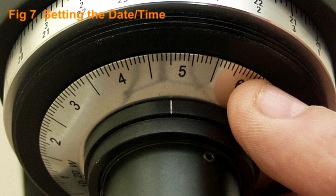
We now need to set a date and time for a known transit of Polaris.
For the sake of this tutorial and ease of visibility on the accompanying
pictures we are going to set a transit time of 23:00 on October
10th.
To set date and time simply turn the
Date Circle ( Fig 7 ) until the date you require is in line with the time you
require for transit. The date circle is divided into months and days with
markers for every 2 and 10 days. |
 |
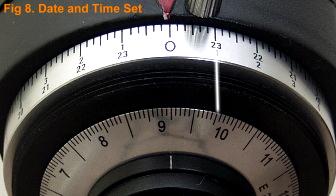
You can see in Fig 7
the Date Circle being turned to its setting for the transit time of 23:00 on
October 10th - i.e. the time shown on the RA Index
( 23:00 ) lines up with the Date shown
on the Date Circle ( i.e. 10th of the 10th ) in Fig 8.
The
RA Index has two sets of numbers. The upper numbers are for the Northern
Hemisphere the lower numbers are for the Southern Hemisphere.
How do you know what time and date to use as a
transit ?
To find out what time and date Polaris is in transit you will
need either a star catalogue/almanac OR a quick way is to use a program called
PolarFinder. You can get this free on-line from
|
 |
http://24.237.160.4/files/Astronomy/software/Polarfinder/
Using PolarFinder you can find
a time for transits at your location and simply set up the polar scope circles
on your mount for your own time and date. Remember to compensate for Summer
Time or Daylight Saving Time and use GMT only if your in the
UK.
Note: I would advise you ALWAYS scan
any downloaded programs for virus/spyware threats before running
them. |
 |
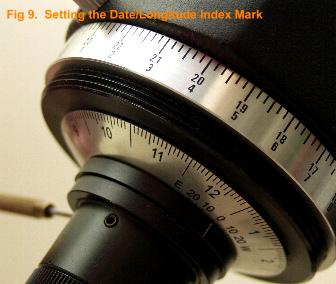
Locking the Date/Time Index
Mark
With the date and time set as per Fig 8 you now loosen the
Date/Longitude Index Mark ring by loosening its set screw ( its a small
recessed screw on the same ring as the index mark ) you will need a flat
bladed jewellers screwdriver to release/lock
this.
Unlock the ring that contains the Date/Longitude Index Mark and
rotate it until the mark is opposite the 0 on the longitude scale as shown in
Fig 9. Be careful as you do this you don't move the Date Circle. Now lock the
Date/Longitude Index Mark by fastening the locking
screw.
|
 |
The purpose of the two locking positions on the RA INDEX and the TIME
CIRCLE is simply so you have a reference point if the circles get
moved.
If the circles are moved simply set both circles Zeroes to their
respective index marks i.e. RA Index Scale is set to 0 against the RA Index
Mark and Date Circle is set to 0 against the Date/Longitude Index Mark. In
these positions everything is calibrated and ready to use. You will see how on
the next page.
IF YOU LIVE IN THE GMT TIME ZONE YOUR DONE FOR
CALIBRATION
OF THE POLARSCOPE.....Click Here to go to the next
page.
For people
living in a different time zone you may need to adjust for Longitude Offset -
this is described below. |
|
|
| LONGITUDE OFFSET |
From the Sky-Watcher manual:
The alignment procedure requires that
you set the Longitude scale to "Zero".
Depending on where you live, "Zero" can be anyplace
between the E and the W on longitude scale, so first you need to determine
where zero is for your location.
Your Zero point is equal to the difference between your actual
longitude and the longitude of the central meridian of your time zone. To
calculate the longitude of your central meridian, multiply your time zone
offset from Greenwich Mean Time (GMT) by 15. For example, in Waterloo, Ontario,
Canada (Eastern Time) the time zone offset is -5 hours. Ignore the sign and
simply multiply 5 x 15 = 75.The longitude of the central meridian for the
Eastern time zone is 75 degrees west. The actual longitude at the viewing
location in Waterloo is 80 degrees 30 minutes West. Ignore the 30 minutes and
just use 80 in the equation. Now it's simple, 80 - 75 = 5. Since 80 is greater
than 75 the result is positive 5. That means Waterloo, Ontario is west of its
Central Meridian. In this case, the zero point is at the "5" mark on the W side
of the scale. If the location was east of its central meridian the equation
would yield a negative value. In that case the E side of the scale should be
used. |
|
|