 |
 |
 |
Place the mount on a flat
surface with some soft
towelling to
protect the external finish |
Using an allen key loosen the three allen headed grub
screws around the dovetail holder. |
Remove the dovetail holder. This may need to be rocked a
little to remove it. This can be placed to one side. |
|
|
|
 |
 |
 |
| Use a phillips screwdriver to
undo the screw holding the DEC clutch lever. This may be very tight so be
careful not to strip the head from the retaining screw. |
Remove the DEC clutch lever. You may need to prise this
away carefully using a wide tipped screwdriver. |
Remove the DEC clutch bolt. This may be quite tight and
you may need to use a spanner. |
|
|
|
 |
 |
 |
| Fully remove the DEC clutch bolt from the mount along with the small
brass button. If the button cannot be removed easily then ignore it. It can be
extracted easily later in the procedure. |
Remove the safety nut from
the declination weight bar. |
Now remove the weight bar
from the mount by pushing it up and through the mount towards the dovetail
holder end. Place the weight bar aside. |
|
|
|
 |
 |
 |
| Using an allen key slacken the three grub screws around the weight
bar retaining collar. |
Unscrew the retaining
collar.
Note: This fitting can be VERY
tight. |
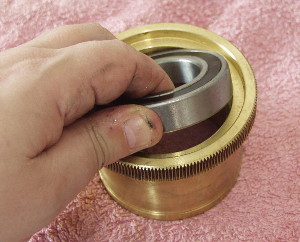
Here is the counterweight collar being fully removed. Be careful not
to lose the small brass button on the back of the weight bar lock lever. This
may well stay with the collar but it may, now that the weight bar has been
removed, fall out easily. This item can now be put aside. |
|
|
|
 |
 |
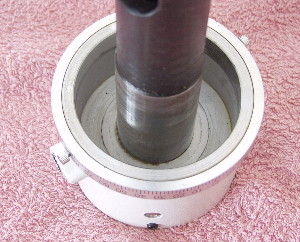 |
Now
lightly tap the end of the declination shaft
which is exposed (after removing the counterweight
collar) with a rubber mallet or block of
wood.
In this picture I am using the large plastic handle of a screwdriver
to act as a buffer for the mallet. |
The declination shaft will now slide free of the
mount. |
Here is the declination shaft removed. At this stage you
can remove the small brass lock button from the clutch lever if it wasn't
removed earlier.
Note: You can see in this picture the almost
invisible teflon washer at the end of the shaft. |
| |
|
|
 |
 |
 |
| Unlock and remove the DEC scale from the declination
collar. |
Carefully extract the teflon washer from the rear of the
declination shaft and place it aside. Make sure it is not confused with other
washers that will be removed later. |
The cone/taper bearing at the base of the mount will now
drop free. Remove this and check that the bearing surfaces of the mount are
clean and free from corrosion or paint. |
| |
|
|
 |
 |
 |
| Slacken off the upper worm gear set
screw adjuster using an allen key. This will need to be slackened off a
lot. |
Slacken off the lower worm
gear set screw. This will need to be slackened off a lot. |
Remove the worm carrier cap headed bolts. These may be
very tight on the EQ6 and you may need a socket set type wrench to remove
them. |
|
|
|
 |
 |
 |
| Remove the worm drive carrier. It may stick if the set screws have
not been slackened off enough. |
Here is the base of the
worm carrier. You can see another thin teflon washer here. This may be stuck to
the mounts bearing or the worm carrier so take care. Set this washer aside and
make sure it is not confused with the washer from the base of the declination
shaft removed earlier. |
Remove the two roller
bearings from the Declination
gear.
These may simply slide out or they may need to be tapped out using a wooden
pole and a mallet as a driver. On this mount the bearing simply pushed free
without much effort. |
| |
|
|
 |
 |
 |
Here is the top of the mount with
the DEC worm carrier removed. You can see over-sprayed paint both on the edges
of the mount and also on the bearing and the edges. In fact in looked worse
than the picture suggest. The paint should be scrapped away carefully and a
very fine emery cloth applied to remove paint and
imperfections.
You can also see here the
motor gear. At this stage in the strip down I removed the motors. You can see
this process HERE |
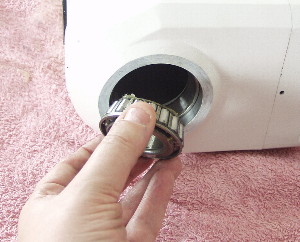
Before cleaning up the top of the DEC assembly the
facing bearing shown in the previous picture was removed. You can remove this
using a wooden pole/spline through the mount. This needs to be done very
carefully by applying a few taps at a time around the bearing. Be careful not
to damage the bearings dust seals. |
Here is the face bearing being removed from the
mount. |
| |
|
|
 |
 |
|
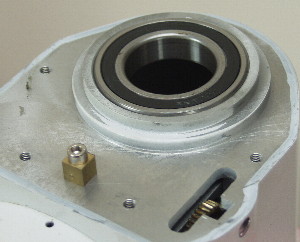
| Now ensure that the bearing faces
in the DEC axis are clean and free of paint, corrosion etc. Here is the bearing
face for the taper bearing at the base of the DEC axis. |
Here is the top of the DEC axis cleaned up. This picture
was actually taken after the bearing was reinstalled. Note the absence of paint
from the bearing faces and the edge of the mount. |
|
| |
|
|


