aastro-babys guide to stripping and rebuilding the Synta EQ6/Orion Atlas mount
2 - Synta EQ6/Orion Atlas - Lubrication & Re-Assembling the Declination (DEC) Axis


This procedure will guide you in re-assembling the EQ6/Atlas Declination axis and follows on from the stripping down and cleaning guide HERE.

GENERAL NOTE: Very little of the mount assembly requires brute force on tightening down components. They need to be firm but not so tight the threads pop.
Generally a light touch is required rather than brute force. Remember this is a precision piece of engineering and many of the fittings are aluminium so threads
can be easily stripped and ruined. As with the strip down process if you hit problems STOP and THINK. If something won't fit theres a reason.


NOTE ON LUBRICATION: When this guide was originally written the accepted wisdom was that white lithium grease was an overall good lubricant. However
it would appear thatstandard white lithium grease may cause problems under some extremes of damp/temperature. All of the mounts I have rebuilt have been
done with white lithium that is stable and often mixed with a syntehtic like Teflon or PTFE. It is best to consult the manufacturer on the quality of the product.

I find TF2 White Lithium grease with Teflon to work well.

Also I have seen questions asked about the density of grease used in packing the bearings. The grease should be forced into the bearings and should
provide good all round lubriucation. You dont need to pack the bearings solidly with grease.

 
Stage 4 - Re-assembling the Worm Carrier
Replacing the worm roller carrier Replacing the worm into the worm carrier Tighten down the worm motor gear set screws
Lubricate the small worm roller bearings and insert one of them into the motor side of the worm carrier.
Note: You may need to use a driver to do this so use a small plastic handles screw-driver as shown in the picture. You can lightly tap the tip of the screwdriver with a hammer if the bearing is tight.

Note: It has been reported that some mounts will only accept the worm roller bearing from one direction (ie from the outside OR the inside of the carrier). If your having problems getting the worm into the carrier try coming from the other side.
Replace the motor gear and the worm into the carrier. Take note that on the motor gear side it has a flat. Align the flat with the allen headed grub screws on the motor gear. Tighten the grub screws on the motor gear to the worm.
Note: The motor gear must have one of its grub screws against the flat on the worm. One of the grub screws may be longer than the other. The long one goes against the flat. Both grub screws should be almost flush with the motor gear spindle when finished.
Note: There is a space between the motor gear and the widest part of the worm. It does not fit flush to the wide part of the worm gear.
Replacing the second worm roller bearing Relacing the slotted nut into the worm carrier Tightening down the worm carrier cover
After lubricating install the other worm roller bearing. Install the slotted nut onto the worm assembly. Do not overtighten this as this will need to be adjusted later. A light pressure is enough at this stage. Screw on and make tight the black metal cap that covers the worm end on the motor side of the assembly.
Note: The metal cap for the other end of the worm gear is left off at this stage as it will require tuning later.
     
The assembled and lubricated worm carrier  
Here is the worm carrier reassembled and lubricated with lithium grease. Its edges have been cleaned up from any excess paint.  
     
Stage 5 - Re-assembling the Declination Axis
Reassembling the worm gear main bearings Reassembling the worm gear main bearings Replacing the main declination housing bearing
Reinsert the main roller bearings into the DEC worm gear. You can use a small smear of lithium grease to help them seat into the worm. 
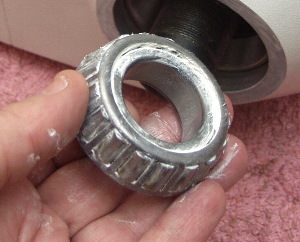
You may need to use a wooden or rubber mallet to gently tap the roller bearings into place. This is the bottom roller bearing being inserted using a wooden handle and is being hand tapped into place. Iinstall the DEC main housing roller bearing onto the top of the DEC axis. This may need to be tapped into place using a wood or rubber mallet.
Lightly lubricate the top of the bearing.
     
Replacing teflon washer to the dec gear replacing the dec main gear Replacing the worm carrier
Replace the worm gear teflon washer making sure this is the same one you removed earlier. Use a small dab of grease to secure it to the worm gear and make sure it stays centered during the rest of this procedure.
Note: If you wish to carry out supertuning with replacement shim washers read the supertune guide HERE
Replace the declination worm gear onto the DEC main housing and lubricate the teeth at the base of the DEC gear. Also apply a small smear of grease to the face of the top roller bearing.
Keep the main barrel element free of grease as this will impair the ability of the DEC scale to be locked when in use.
Replace the worm carrier onto the mount. Make sure that the worms motor gear is aligned properly with the slot for the motors running gear.
     
The declination main spindle and collar assembly replacing the declination scale replacing the Dec lock button
After cleaning out any grease or debris from the declination collar/spindle assembly replace the teflon washer. Replace the DEC scale making sure it is correctly orientated to the mount (ie make sure it is the right way up for the mount when assembled)  Replace the Declination lock 'brass button'.
Note: On the EQ6 being stripped down for this guide this button could ONLY be installed from the inside. Check with your own mount whether it needs to be installed from the inside.
   
Replacing the Declination lock button Replacing the declination axis spindle Replacing the worm carrier cap headed bolts
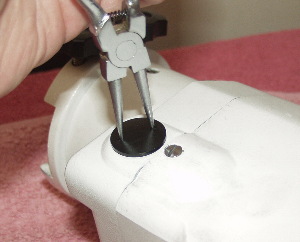
Here is the declination lock button installed into the DEC collar assembly. Gently insert the declination collar and spindle assembly into the mount main housing. Take care that the teflon washer between the DEC gear and the DEC housing is not damaged during this step and that the brass lock button does not fall out. Replace the cap headed screws on the DEC worm carrier.
     
replacing the worm carrier cap headed bolts (2) The upper set screw The lower set screw
Do not tighten the DEC worm carrier down. Just apply enough pressure to stop it moving about but not too hard. It will need adjusting later. Wind the upper set screw for the worm carrier back into the mount but do not tighten it. It just needs to be put back so that it is not proud of the mount. Wind the lower set screw for the worm carrier back into the mount but do not tighten it. It just needs to be put back so that it is not proud of the mount.
     
The declination lower tapered bearing Inserting the tapered bearing Replacing the weight bar collar
Pack the taper bearing with lithium grease and wipe off any excess. The easiet way to pack the bearing is apply a blob of lithium grease on the palm of your hand and then force the bearing into the grease. This will force grease inside the bearing. Now reinstall the taper bearing into the bottom of the DEC axis housing. Do not worry if it will not go all the way. So long as a few threads from the DEC spindle are showing that is enough. Replace the weight bar collar and screw it down. Tighten it as far as it will go by hand and then back off until the weight bar collar locking lever is in line with the DEC clutch lever.
     
Tighetning down the weight bar collar set screws Inserting the dec clutch lock bolt Replacing the clutch locking lever
Tighten down the weight bar collar allen headed grub screws. Apply some lithium grease to the declination clutch locking bolt and then replace the bolt. Screw this in until it is tight and the declination axis is locked. Replace the DEC clutch lever and test that you can both lock and free the DEC axis before replacing the screw and tightening it down.
     
replacing the weight bar Replacing the weight bar safety nut Replacing the dovetail carrier
Replace the weight bar by sliding it back into the DEC spindle through the top of DEC axis. Replace the weight bar safety nut. Replace the dovetail carrier. The locking bolts for the dovetail carrier should be opposite the DEC clutch lever.
     
Tightening down the dovetail carrier set screws Replacing the worm gear cover (2)  
Replace the dovetail carrier grub screws and tighten down. When tuning is completed for the worm gear (see HERE) the remaining worm carrier cover can be replaced.  
 
The Declination axis is now completed. If you wish to strip and adjust the Right Ascension axis go back to the main page HERE