 |
 |
 |
| Remove the polar scope cover. |
Remove the polar scope. You may need to grip
it
with a wrench - if so wrap a cloth
around the
polar scope to protect it.
Alternately use some
masking tape to
protect the scope. |
Once loosened simply unscrew the polar scope
and
place it somewhere safe. |
| |
|
|
 |
 |
 |
| Place the mount on an even surface covered with some
towels to protect its external finish. |
Remove the silver Phillips screw in the RA
lock
lever. |
Remove the lock lever. You
may need to prise this
up by using the
tip of a flat bladed screwdriver and
gently twisting the tip. |
| |
|
|
 |
 |
 |
Remove the brass RA lock
bolt. You may
need to use a small
spanner or pliers. Also remove
the small brass button beneath the lock
bolt.
If this is hard to do leave it - it can be
removed easily later in the procedure. |
Undo the three screws
around the polar scope index ring/cover. |
Remove the polarscope index ring/cover.
Note: Some older EQ6 mounts do not contain an
index marker on this component. If your mount does have this marker be careful
- its VERY sharp. |
| |
|
|
 |
 |
 |
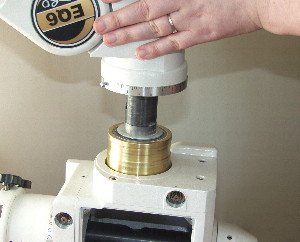
| Slacken the three hex headed grub screws around the
polarscope mounting plate. This large component is also the main nut for the RA
spindle. |
Removing the RA main nut using an oil filter
wrench.
Note: This bolt is
completely smooth and its VERY hard to remove see the observations
below.
|
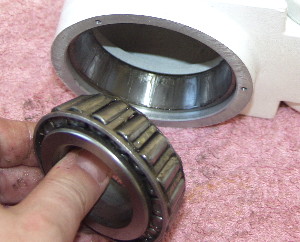
The RA main nut being removed exposing the RA spindle
and the tapered bearing. |
| |
|
|
 |
 |
 |
Tap the RA main spindle to drive it out. It should move
easily but if not then tap it gently with a wooden or rubber
mallet.
DO
NOT use a hammer as shown in the picture above. This was used only
for photographic purposes. |
Remove the main RA Axis assembly from the base of the
mount.
Note: At this point the
small brass button for the
RA locking lever will be easy to
push out if you
were
unable to extract it earlier. |
With the RA main axis removed the tapered bearing at the
base of the RA block will simply drop out. |
| |
|
|
 |
 |
 |
| Loosen the upper RA worm carrier set screw. |
Loosen the lower RA worm carrier set screw. |
Remove the worm carrier cap headed bolts. These were so
tight on this mount that a socket set was required. |
|
|
|
 |
 |
 |
| Remove the RA scale. This may remove with the main RA
block or be left behind on the worm carrier. |
Remove the worm carrier from the mount. |
Remove the worm gear from the RA block - the picture
shows the RA worm gear with its top bearing removed. Take care to look out for
the teflon washers. The mount may have one or two of these. They may be stuck
together with grease so exercise care. Place the teflon washer(s) aside and
keep them separate from any other washers. |
| |
|
|
 |
 |
 |
| Beneath the RA worm gear will be another teflon washer.
Make sure this is removed and set aside and kept separate from all other
washers. |
With the RA worm gear removed a fair amount of corrosion
was observed on the RA spindle along with some rough machining. Its doesn't
show well in the photograph above |
Remove the bearing from the mount base. This can be
tapped out using a wooden pole and a mallet in the same way as the DEC housing
main bearing shown in the DEC strip down module. |
|
|
|


