astro-babys guide to stripping and rebuilding the Synta EQ6/Orion Atlas mount
4 - Synta EQ6 / Orion Atlas - Lubrication & Re-Assembling the Right Ascension (RA) Axis


This procedure will guide you in re-assembling the EQ6/Atlas Right Ascension axis and follows on from the stripping down and cleaning guide HERE.

NOTE: Very little of the mount assembly requires brute force on tighetning down components. They need to be firm but not so tight the threads pop.
Generally a light touch is required rather than brute force. Remember this is a precision piece of engineering and many of the fittings are aluminium so threads
can be easily stripped and ruined.

NOTE ON LUBRICATION: When this guide was originally written the accepted wisdom was that white lithium grease was an overall good lubricant. However
it would appear thatstandard white lithium grease may cause problems under some extremes of damp/temperature. All of the mounts I have rebuilt have been
done with white lithium that is stable and often mixed with a syntehtic like Teflon or PTFE. It is best to consult the manufacturer on the quality of the product.

I find TF2 White Lithium grease with Teflon to work well.


Also I have seen questions asked about the density of grease used in packing the bearings. The grease should be forced into the bearings and should
provide good all round lubriucation. You dont need to pack the bearings solidly with grease.

 
Stage 4 - Re-assembling the Worm Carrier
Replacing the worm bearing in the carrier Replacing the worm bearing (2) Replacing the worm into the worm carrier
Lubricate the small roller bearing and replace it.
Note: It has been reported that some mounts will only accept the worm roller bearing from one direction (ie from the outside OR the inside of the carrier). If your having problems getting the worm into the carrier try coming from the other side.
The small roller bearing may need to be tapped into place. This can be done using a small plastic handled screwdriver as shown above. Replace the motor gear sprocket and insert the worm into the worm carrier.
     
Setting the worm and motor gear set screws The worm end roller bearing end cap
Replacing the other worm carrier bearing
Tighten the grub screws on the motor gear to the worm.
Note: The motor gear must have one of its grub screws against the flat on the worm. One of the grub screws may be longer than the other. The long one goes against the flat. Both grub screws should be almost flush with the motor gear spindle when finished.
Note: There is a space between the motor gear and the widest part of the worm. It does not fit flush to the wide part of the worm gear.
Screw on and make tight the black metal cap that covers the worm end on the motor side of the assembly.
Note: The metal cap for the other end of the worm gear is left off at this stage as it will require tuning later.
After lubricating install the other worm roller bearing.
 Tightening the worm float adjuster  The assembled RA worm carrier  
Install the slotted nut onto the worm assembly. Do not overtighten as this will need to be adjusted later. It only needs to be under slight pressure at this stage. Here is the worm carrier reassembled and lubricated with lithium grease. Its edges have been cleaned up from any excess paint.  
     
Stage 5 - Re-assembling the Right Ascension Axis
RA wom gear and bearings RA worm gear and bottom bearing Replacing the RA spindle teflon washer
Replace the roller bearings into the brass worm
gear - apply a small amount of grease to the edges.
These may have to be tapped into place
using a nylon hammer or a block of wood.
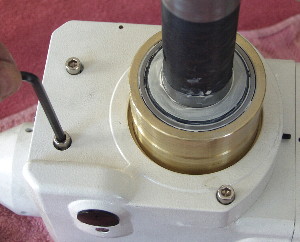
Here is the base of the RA worm gear with its bottom roller bearing in place Replace the teflon washer onto the RA spindle making sure this is the same washer that was removed in the strip down stage
Note: If you wish to carry out supertuning with replacement shim washers read the supertune guide HERE
     
Replacing the worm gear on the RA axis spindle Worm gear on the RA axis spindle (2) Replacing the worm gear first teflon washer
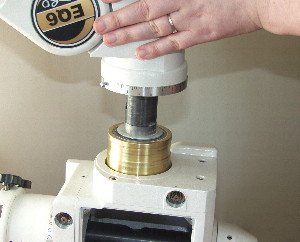
Replace the brass worm gear and its roller bearings onto the RA Axis spindle. Apply lubrication to the teeth of the RA worm gear. Shown here as white lithium grease.
Avoid the main part of the barrel getting grease on it as this will impair the ability of the RA scale to be locked when in use.
Replace the teflon washer(s) to the top of the brass worm gear.
     
Replacing the worm gear second teflon washer Worm gear on the RA shaft lubricated and ready Replacing the worm carrier
This picture shows the second of two teflon washers in this EQ6 being replaced. RA worm gear and washers in place. Add a smear of lithium grease to the top surface. Replace the assembled worm carrier.
   
Worm carrier for EQ6 RA installed Replacing the worm carrier cap headed bolts Tightening the RA worm carrier cap headed bolts
Assmebled worm carrier installed onto the RA axis main block. Replace the cap headed screws into the RA worm carrier.
Tigyten the cap headed screws down but not too tight. Allow some small movement to take place in the worm carrier.
     
Tightening the RA worm carrier upper set screw Tightening the RA worm carrier lower set screw Installing the mount base main bearing
Tighten the upper set screw enough so that it is no longer proud of the casing. Tighten the lower set screw enough so that it is no longer proud of the casing. Replace the EQ6 mount base main bearing.
     
Tapping the mount base main bearing into place Reinstalling the RA scale RA unit being remounted to the EQ6 base
The mount base bearing may require to be tapped into place using a wooden driver. In this case the handle from an old hammer. Replace the RA scale to the mount. Ensure that this is correctly orientated. Install the mount base on to the RA axis.
     
Tapered RA bearing being installed The EQ6 Main RA 'Jesus' Nut Tightening the RA main nut
Pack the taper bearing with lithium grease and wipe off any excess. The bearing can be easily packed by applying a large blob of grease to the palm of your hand and then forcing the bearing into the grease.
Now reinstall the taper bearing into the bottom of the RA axis housing. Do not worry if it wont go all the way. So long as a few threads from the RA spindle are showing that is enough.
Replace the main RA nut. Tighten the main RA nut down. This doesnt have to be put down with a huge amount of pressure, Just enough to compress the taper bearing into the mount. test the movement of the RA axis. If it feels over tight then loosen the main nut slightly.
     
Tightening the EQ6 RA main nut set screws Replacing the polar scope surround and index Replacing the polar scope surround and index marker
Tighten the main nut set screws using an allen key. Replace the polar scope surround.... ..and screw it back into place.
     
Reinstalling the RA lock brass button Reinstalling the RA lock bolt Reinstalling the RA clutch lever
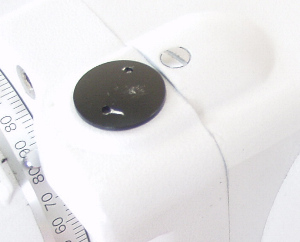
Replace the RA clutch lock brass button. Apply some lithium grease to the RA clutch locking bolt and then replace the bolt. Screw this in until it is tight and the declination axis is locked. Replace the DEC clutch lever and test that you can both lock and free the DEC axis before replacing the screw and tightening it down.
     
Reinstalling the RA clutch lever screw Reinstalling the polarscope Fitting the polarscope cover
Replace the RA clucth lever screw. Replace the polarscope. Refit the polarscope cover.
 
The RA worm float cover    
When tuning is completed for the worm gear (see HERE) the remaining RA worm carrier cover can be replaced.    
 
The Right Ascension axis is now completed. If you wish to strip and adjust the Declination axis go back to the main page HERE