 |
| 1-Background |
There comes a moment in every
technicians life when your own confidence and your ego can take a bit of a
knock back. This was mine !
Now I
like to think that its our failures that teach us the most and help to keep
self confidence balanced at a point safely short of arrogance. The recent
rebuild of a Skywatcher EQ6 tested my patience and abilities to the limit
and I felt it worth writing up the experience.
I have not written this
up with any sense of smugness but rather that it gives people considering a
mount rebuild some clues as to the possible issues and
how I overcame them in the hope it might save some of
you time. It also taught me a lot about the engineering of these mounts which
wasn't discovered in the
original
rebuild guide or the super-tune guide for reasons which will become apparent
when you read through this case study.
It also shows how difficult a
mount rebuild can be even when you have a lot of experience and a lot of tools
to work with. It might also scare some people
who are convinced their mount is OK. If that's you then
move along because this part of my EQ6 guide might well give you sleepless
nights.
Rather than rewrite the original EQ6 strip down guide with a lot of
extra information, much of which wont be used in the average rebuild I have
written
this as an addendum to be read
with the main guide. Even if your rebuild goes smooth some of the information
in this section will be worth a read.
|
| 2 - Initial Diagnosis and Mount
History |
This EQ6 presented
with a problem with its backlash and tracking. The mount would track reliably
but when the user overrode tracking using a small
amount of slewing to
correct for tracking errors the mount failed to maintain tracking afterwards
and in some cases demonstrated unacceptable amount of backlash.
Repeated manual slewing would cause the mount to
eventually regain some reliability of tracking.
The mount was tested by me prior to rebuild and appeared
to work quite well. The motors were relatively quiet with little gear noise and
there was no
observable play in either axis.
The backlash problem
appeared to me to be poor set-up on the motor/worm meshing. The mount was quite
old with a history of at least one previous
owner and as the mount showed some signs of having been opened up I suggested a
full strip down and rebuild. Its impossible to estimate the age of this mount
but I would imagine its at least 4 years old (ie manufactured around
2007).
I felt it likely its overall assembly may be a bit poor (some of the
early EQ6s did appear to suffer all manner of ill often associated by poor
quality control at the
factory). If
nothing else I felt sure the mount would be filled with the black goop that
passes for lubricant in some of the Skywatcher mounts.
What followed
was the strip-down from hell with a mount I christened the 'demon' mount for
the huge amount of problems it was suffering internally. These included
seized and broken bearings and every single
internal shim washer being in a state of decay/destruction which was
unexplainable.
This isn't a complete strip down guide - just the edited
highlights to show you how bad a mount can get while showing no outward signs
of distress. I suspect given time the problems would have gotten
worse.
|
| 3 - The Declination (DEC) Axis
- Part I |
 |
 |
 |
The DEC axis is usually the easier of
the two to strip down.
On this
mount this proved not to be the case. After removal of the DEC collar and
loosening of the hex bolts around the worm carrier......
|
...normally a tap at the end of the
DEC shaft would be sufficient to free it from the mount.
On this one I
was faced with what I came to call the bearing from hell.....
|
The DEC shaft taper bearing was seized to the shaft and
no amount of careful tapping would extract it either directly or with a drift
tool. Across the course of about 5 evenings I repeatedly lubed it with WD-40 to
no avail. The bearing material is too hard to cut with a hacksaw or drill and
with the bearing recessed and surrounded by light allow and paintwork heating
the bearing up seemed inappropriate. My bearing extraction tool lacked the
strength to remove this bearing. |
| NB: This is a picture from the original rebuild guide on a different
mount. |
NB: This is a picture from the original rebuild guide on a different
mount. |
|
| |
|
|
 |
 |
 |
After trying to freeze the shaft itself by packing it
with ice while heating the bearing gently achieved no results I decided on a
radical solution. A metal club hammer ! The metal/metal impact proved
sufficient to eventually drive the shaft out from the bearing. This had to be
done EXTREMELY carefully and during this process I porbbaly came close
to a heart attack at times.
The bearing is shown above after extraction
- only perhaps 50% of the damage was done during the extraction process showing
what bad shape the bearing was in before I started work. |
Here was the cause of the problems. It doesn't show well
in this photograph but there were shards of metal raised out from the DEC shaft
where the bearing would seat. These together with no lubrication had caused the
bearing to seize solid to the shaft.
The shaft itself also
suffered a small flaring at its tip from the metal to metal impact during
removal. This prevented the DEC collar being refitted and had to be filed
gently back to shape. |
Once the seized bearing was removed and the DEC shaft
could be slipped out the main mount block was cleaned up. In this picture the
motors and electronics have been removed so that the entire casing can be
cleaned out. The casing showed all kinds of sludge and particles inside.
The top face where the worm carrier sits was cleaned and polished
free of any paint to give the worm carrier a perfectly flat
surface. |
| |
|
|
|
| 4 - A Little Detour in the DEC Axis Strip
Down |
 |
 |
 |
| At one stage with the DEC axis - with the taper bearing
appearing to be completely jammed and non removable I attempted to remove the
crown from the top of the DEC shaft. If this were possible then the DEC shaft
could be extracted from below the mount and the bearing either heated off or
ground off. The top of the DEC shaft is retained by a circular nut shown
above..... |
..and around the crown there are three silver cross head
screws. Underneath these are some small Allen headed grub screws that are
deeply recessed. |
The circular nut on this mount showed a lot of damage. Possibly a
previous owner had attempted rebuild and also been frustrated by the lower
taper bearing.
I found that the top of the DEC appeared to be fitted so
tightly that it would be impossible to move without damaging the paintwork and
opted for the approach of using a hammer to drive out the shaft.. |
| NB: This is a
picture from the original rebuild guide on a different
mount. |
NB: This is a
picture from the original rebuild guide on a different
mount. |
|
| |
|
|
|
| 5 - The Declination (DEC) Axis - Part
II |
 |
 |
 |
Once the seized bearing was removed strip down of the
DEC axis could proceed as per the original guide.
The picture above shows the state of the DEC shim washers on the
base of the worm gear on removal. These had completely disintegrated. Fragments
of them were found throughout the DEC mechanism. |
Here is the DEC top shim washer during removal. Like the
lower shim washers this one had shattered. The material had become frangible
and the slightest movement caused them to start to break up.
You can see the
entire inside of the assembly is coated with black grease. |
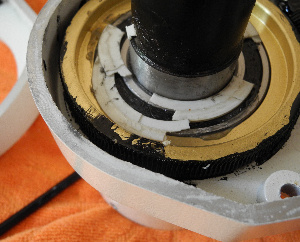
The DEC worm carrier is shown here. As in the previous
pictures you can see the famous Synta goop is very much in evidence. WARNING - this stuff gets everywhere and its like
tar. Its extremely hard to clean and this mount required about 5 wash downs in
very hot soapy water to get it shifted. It took about a day just to clean the
components up ready for rebuild. |
| |
|
|
 |
 |
 |
A close up of the Synta goop which gives you an idea of
its consistency. It really is like molten tar.
Its very hard to remove and
gets into everything. As ever I found hot water and domestic washing up liquid
worked best but it gets expensive in washing up liquid. |
More problems. The worm end roller bearings were in a
very bad state on this mount. This one had suffered damage to its seal on the
face against the worm roller. All of the worm roller end bearings were replaced
during rebuild with new bearings. |
This is the DEC worm carrier after cleaning and rebuild.
All flakey paint was removed from the inside of the carrier and the edges where
it contacts the main assembly were smoothed by placing the carrier on a sheet
of very fine emery cloth on a glass table and gently moving the carrier in a
circular motion to remove any burrs, paint flecks or imperfections from its
mating faces.
New worm roller end bearings were fitted as per the supertune
guide. |
| |
|
|
 |
 |
 |
| The picture above shows the replacement taper bearing
with other components of the DEC shaft cleaned up and ready for reassembly.
Apart from the taper bearing all of the shaft bearings were OK and in good
condition although very light on lubrication. |
The DEC shaft end was filed to shape to remove a slight
lip which has been created by its removal.
The small lip of sub
millimeter size would prevent the DEC collar going on later during
assembly. |
Heres the bearing face on the DEC shaft after careful
work to remove the nasty metal burrs which were causing the bearing to seize.
The indentations are all that remains. These wont cause the mount problems as
they are slightly above the bearing area. |
| |
|
|
 |
 |
 |
| And finally the fully restored DEC shaft. The end piece
has been repainted with a good quality metal/enamel paint. Its not critical but
I like everything to be perfect when I rebuild these mounts. |
The DEC crown with all of the grease and broken washer
parts removed awaiting reassembly. |
Finally the DEC worm assembly is reassembled with new
worm end roller bearings and new Delrin shim washers.
The shims presented a special problem on this mount and
are covered in more detail below. The gears are coated in a good quality
lithium grease. |
| |
|
|
|
| 6 - The Right Ascension (RA) Axis &
Motors |
 |
 |
 |
| The RA axis of this EQ6 was in better shape and in the
main stripped down exactly as per my EQ6 strip down guide. However as with the
DEC axis the Synta goop was very much in evidence along with broken shim
washers..... |
....here is a fragment of one of the shims that was
rattling around the gears. Like the DEC shaft the RA shaft had its share of
nasty stuff - mostly mashed up pieces of the washers which had been ground down
into a kind of paste. |
The nasty stuff on the RA gear included this. The
picture shows something that resembled glue stuck to the base of the RA Worm
gear. It came away quite easily and had the consistency of dried plastic gel
beading. |
| |
|
|
 |
 |
 |
| Just like the DEC axis the RA axis had every
single shim washer in a bad state of repair. This one just disintegrated into
fragments at the lightest touch. |
Heres the same washer as the previous photograph seen
from the other side.
Loose paint was
much in evidence and this was cleaned away along with the remains of the Synta
grease. |
Here are the two RA lower shim washers after removal.
One was split neatly. The other was frangible and just broke up. The missing
fragments were ground up in the gears and inside the worm carrier. |
| |
|
|
 |
 |
 |
| Just like the DEC axis the RA was fully cleaned up and
degreased and the worm roller end bearings were replaced with brand new
bearings. |
The disintegrated shim washers had found their way in
all areas of the mount. This small fragment was found wedged underneath one of
the motor gears. Because this mount was in such poor shape internally it was
stripped completely and cleaned with repeated washing out. |
Most of the mount bearings after cleaning. The small
worm roller end bearings are to the front with their black plastic seals. The
other bearings were completely cleaned and washed out to remove any
contamination before being greased with white lithium and their seals being
replaced. |
|
|
|
|
| 7 - EQ6 Shim Washer
Considerations |
 |
 |
 |
Unlike previous mounts I have rebuilt the fact that this
one needed a wholesale replacement of all of its washers created some problems.
The shim washers control different
aspects of the mounts fittings. The lower shim shown in the diagram above
controls the height of the worm gear while the upper shim adjusts the height of
the axis above the main mount block. |
The simplified diagram above shows the lower shim in red
which controls the height of the worm gear to get correct engagement with the
worm roller. Getting the correct height is explained in the supertune guide
HERE.
The upper shim shown in green controls
the distance between the axis casing and the main worm carrier. This is easier
to see with the DEC axis but the principle is identical for the RA axis. The
axis casing and worm carrier are shown as the dotted line. |
If the upper shim is too small you will find the mount may bind
against the worm carrier along the line shown by the pencil in the above
picture. This is where the axis joins the main mount casing and (on the DEC
axis) is just below the DEC scale. On the RA axis it is below the RA
scale.
If the upper shim is too large it will create an unsightly gap
between the scales and the mount. I corrected this by trial and error fittings
of different sized shims until I was happy. |
| |
|
|
|
| 8 - Epilogue |
 |
|
After rebuild the mount
was thoroughly cleaned and any small chips in its paintwork were touched up
with good quality enamel paint. When finally ready the mount looked as good as
new only showing a slight yellowing of its paintwork.
After suitable
tuning the EQ6 in this part of the guide responded well. The mount was not
quite as quiet as it had been running with the Synta grease (although still far
better than most) but it was quite definitely better behaved. Both axis were
smooth and free flowing.
The DEC axis
was never quite as free as I would have expected and hoped but I believe given
time it will settle down in actual use. The bearings being filled with new
grease may have contributed to this aspect.
The mount was rebuilt with zero play in either axis and with a
flawless backlash. When the mount comes to a halt a press on the slewing keys
in either direction will set the mount moving immediately. Its tracking
performance was tested against a stationary target and timed and was consistent
and true.
The pictures to the left show the mount in a complete state of
disassembly and the mount after rebuilding and cleaning. |
|
|
|
| |
| Back to the
Skywatcher EQ6/Orion Atlas Strip Down and Rebuild Index |
| |
|
|