|
To any reader of astronomy message boards and user groups on the web
the one question that comes up time after time from beginners is 'what
telescope should I buy ?' or a variant such as 'what's the best telescope ?'
In this article I will put down my own
thoughts on this having relatively recently been through the same process
myself. Admittedly I was returning to astronomy and had a measure of knowledge
from years ago. However many of the issues I faced in choosing a telescope
would be the same as most beginners.
I hope this guide will help
YOU in choosing the right scope for your needs.
|
| THE BASICS - What to consider |
First things first….
A beginner looking around the market will almost
certainly be swayed by glossy adverts on eBay and wonderful looking equipment
often displayed in camera stores around Christmas. The temptation to buy a
telescope with a promised x700 magnification can be great and when the camera
store is doing a very special price its hard not to be tempted. Here's my first
bit of advice - DON'T DO IT !!!
Telescopes are one of the
exceptions to the rule that 'you get what you pay for'. Quite often appalling
junk is sold with a rather large price tag compared to a quality instrument
from a reputable dealer. What looks like a shiny bargain on eBay can very often
turn out to be almost unusable, or, if it's a reputable branded item it may
have been mishandled by another beginner just like you.
The fact is I have
seen too many posts on astronomy bulletin boards where people have paid over
the odds, sometimes even more than a new scope for a second-hand item that has
problems or have been ripped off buying some no brand scope with terrible
optics only to find out they could have bought a quality product from a
reputable brand for half the price.
That's not to say every pre-owned
scope is a nightmare but use some sound sense and ask the seller questions and
assess if they have experience. Most amateur astronomers will look after their
equipment and you can find some good bargains but as a general rule it's not
advisable for a beginner as they simply lack the knowledge to know what to look
for.
Don't imagine that telescopes are like DVD players or other
commodity items that will just go when asked with plenty of support and spares.
In most cases telescopes of all types require you to devote time and effort to
learning how to use them. This is where buying from a reputable dealer will pay
dividends in the long run.
So - the first rules of buying a scope boil
down to;
- Pick a known brand. These
include Sky-Watcher, Celestron, Meade, GSO, TAL, and Orion Optics but there are
others.
- Buy from a dealer who
specialises in astronomy equipment. He will be able to advise you in the
purchase and support you afterwards and you may well need that support.
- Finally - avoid eBay and
non-specialist shops like the plague you will run a serious risk of ending up
with a lemon.
Aperture, Aperture, Aperture
Most astronomers
when asked what is the best telescope will promote the view that it's all about
aperture (in a nutshell the width of the lens or the main mirror). The larger
the aperture the more the telescope (and you) can see. A larger aperture will
collect more light and therefore both provide a bigger view and a view which
can pick up more detail. I'll talk about magnification later in the article and
why you should be dubious about telescopes promising x700 magnification.
Now while the aperture argument is sound enough it does require the
application of some common sense. The larger the aperture the larger the
telescope becomes, this means the telescope gets longer and heavier. The larger
and heavier the telescope becomes the less likely you will be to actually use
it and indeed it may be that you have nowhere to store a telescope that could
be 6' long and weigh 120lbs. Similarly you may be unable to transport it to a
dark sky site if you live in an urban environment with high levels of light
pollution.
So you can see aperture is only one part of the equation and I
would argue that the real requirement is actually location, location, location.
The darker and clearer your skies the more you can see. A very large telescope
in a light polluted environment will see less than a smaller telescope that you
can take to a dark sky site. You therefore need to balance the aperture against
the physical size, storage and transportation issues.
Don't be fooled
by collapsible telescopes that will claim you can break the scope down and fit
it into the boot of a car. You may well be able to do this but a large
Dobsonian style scope may well have a mirror that weighs an awful lot. Some of
these can reach over 60lbs which is a lot of weight to carry.
Remember
another dictum of astronomy - "the best telescope is one you will
use" - so try not to join 'the biggest one on the block' brigade which
can end up with you having an expensive white elephant sat in your garage or
spare room that never gets used.
Choosing a telescope…
Although the technical aspects of choosing a telescope can be a minefield
for beginners it will help you get good advice if you think about the following
questions and tell dealers about the answers you arrive at in order to allow
them to give you better advice
- Where do you live ? If you
live on the top floor of a tower block in a city your choice almost certainly
needs to take into account portability. If you live in a rural location with a
decent sized garden and low light pollution portability may not be an issue.
- Where will you use the
scope ? Again if you cannot use your telescope from your own location and you
buy a monster telescope that's not easily transported it won't be used. So
think about possible locations.
- How fit are you ? How much
kit can you carry/do you want to carry ? Any telescope requiring power will
require you to carry a power tank (basically a large battery power supply). And
all telescopes will involve you carrying other items such as red light torches,
extra eyepieces and accessories so bear that in mind.
- Transport ? How will you
carry the scope. Even if its in a garden shed in your garden if you buy a large
telescope you may find its too heavy to lift about OR too difficult to set up.
People with bad backs of knees should beware. A lot of this kit is
heavy.
- Cost ? How much do you
want to spend ? I would always advise a beginner to not buy more than they can
afford to lose. I have seen too many people come into the hobby and buy some
kind of monster sized wunderscope only to get bored, find the hobby is too
challenging or simply be unable to cope with a giant telescope and end up
taking a big loss.
- How much time do you have
? This is critical. If you buy a huge complex scope but only have a few hours a
week you will get frustrated very quickly when you spend an hour assembling it
only to have the clouds arrive or to run out of time. Similarly if you don't
have much time to spend you may find that simply finding objects with an all
manual telescope and mount takes too long and something that's a bit more
automatic may suit you better.
The
nice thing about telescopes….
The nice thing about
telescopes (at least from a passionate astronomers point of view ) is there are
so many of them. So many different types to choose from in fact that it can be
very confusing for a beginner. Choice is indeed a curse. In this section I'll
talk you through the various types.
Now the first thing to
establish is that there are two components to a telescope. The first part is
the telescope itself. This is the actual optical part and it's sometimes called
an OTA (Optical Tube Assembly). The second part of any telescope is its
mounting. Just like telescopes these come in a variety of types with various
options. The telescope and the mount can often be mixed and matched so in this
section I'll talk only about the OTA ( that's the telescope bit remember).
Manufacturers usually package the telescope tube and the mount together along
with some eyepieces to use with the telescope but lets look at the various
types of telescopes and mounts below......
|
| TELESCOPE TYPES - What's the difference ? |
|
The types of telescopes
discussed in this section are among the most common types available to
amateurs. There are many other types available but these tend to be either very
expensive or specialised towards specific needs.
|
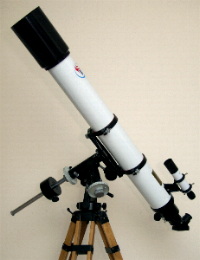
REFRACTORS
The oldest type of telescope
design. These are the classic looking telescope. Refractors are usually quite
long at around a meter in length and the most common aperture sizes are 3", 4"
and 6". You seldom see refractors with a larger aperture as there is a direct
relationship between the lens size and the length. As the lens size increases
the length increases dramatically along with the weight, also the cost of the
glass lenses rises very fast. Bigger refractors do exist but the cost is
prohibitive for all but a tiny percentage of buyers.
Refractors come in
two basic types; Achromatic (which are an older design but less expensive) and
Apochromatic, commonly shortened to APO. The picture to the right shows a TAL
100RS, a fairly typical modern achromatic telescope.
APO telescopes are more
expensive as their lenses are more complex and more expensive to make. So
what's the difference ? Achromatic refractors are longer and can exhibit some
optical defects such as false colour. This is where the lenses create colour to
an object. You can see this in cheap telescopes which produce a definite
coloured hue to the image. APO telescopes correct this but at a much higher
price. APO types are however highly portable being much shorter than their
achromatic cousins. APO telescopes also have a shorter focal ratio which makes
them better suited to the needs of astro-imaging. |
|
|
Focal Ratios
The focal ratio of a telescope is derived from dividing its focal
length (how long the telescope is) by the width of its largest optical element
(either its lens for a refractor or its primary mirror for a reflector). So a
refractor that has a focal length of 900mm with a 100mm aperture (4") has a
focal ratio of 9 usually expressed as F9 (900/4=9) High focal ratios such as
F8-F15 provide a 'slow' telescope. The slower the scope the worse it becomes
for astro imaging. For visual it provides a scope which will show better
definition on planets and the moon but will provide less good results on faint
objects such as nebula and galaxies. This is true of most refractors as they
are limited in aperture to typically no more than 5-6" compared to a reflector
which can easily be 12" and still retain portability and low enough cost for
the amateur. |
|
Refractors can
provide beginners with a simple to use telescope, a relatively comfortable
viewing position given that the eyepiece always stays more or less accessible
(though when looking high in the sky you may end up kneeling down on wet grass
a lot).
Refractors generally work
well on any bright object such as a planet, the moon or star clusters. Stars
will show as tiny white perfect dots of light and a quality F10 refractor will
show the moons surface and planets incredibly well. Refractors require almost
no maintenance and are generally rugged enough to be suitable for children to
use. |
A word on children using telescopes
NEVER,
EVER leave a young child with a telescope during daylight hours. One look
at the sun through even a modest telescope will result in serious eye damage
and potentially blindness for life. If you do buy your child a telescope then
please take care and caution them about the dangers of the sun. Children often
take rather well to objects like the moon and a refractor is simple enough for
a child to get to grips with. Don't be put off using small cheap telescopes
where smaller children are concerned. Even the meanest of telescopes can
provide a child with some wonder where a more complex telescope that's
difficult to manage may actually put them off. |
|
Refractor Pros - Easy to
use/maintain - Rugged and reliable - Great for planets and bright objects.
Refractor Cons - Expensive for
aperture - Large units can be heavy and long - Not the best for deep sky
objects |
| |
 |
NEWTONIAN REFLECTORS
Newtonian reflecting
telescopes (often just called reflectors or newts) use a large mirror instead
of a lens to capture light. Because a mirror is less expensive to make than a
complex group of lenses reflectors offer the biggest 'bang for the buck' in
terms of aperture and as a result are much favored by amateurs especially for
deep sky observing of galaxies and nebula.
Typical amateur reflecting telescopes range from 4" through to a
whopping 16" - even larger reflectors appear in the amateur community with some
owners having enormous 40+" telescopes. A more typical size though is 6" to 12"
for many amateurs.
The picture to the left shows a Skywatcher 130PM, a
fairly typical small reflector of 5.1" aperture. It is shown here on an
equatorial mounting but is offered in a variety of different versions. We'll
see more about mounts later in this article.
Reflectors suffer no false colour issues caused by lenses but instead
because of the basic design cause a diffraction pattern. In a nutshell this
means stars appear as pin points of light with a fine cross through them rather
like a classic star shape. Some people find this appealing others find it
annoying.
Reflectors just like
refractors come in different lengths and this affects their focal ratio. Most
modern reflectors from commercial companies are built to be around F5 which is
known as a 'fast' scope. Longer reflectors have slower focal ratios of around
F10 and these are sometimes called 'planetary reflectors' or 'long tube
reflectors' because their length is greater than a fast reflector. |
Reflecting telescopes are very often the workhorse telescope of
choice for many amateurs as they offer a large performance at a relatively low
cost. Reflectors offer the best overall performance for deep sky viewing of
objects such as nebula and galaxies but fast reflectors don't generally perform
as well on planets and the moon as a quality refractor. |
Mirror Mirror in the tube - what's the difference to a noob
?
Reflectors can use two different types of mirror. The older
design uses what's known as a spherical mirror. This has no disadvantage in a
slow reflector of around F8 but it's not possible to have a fast reflector with
a spherical mirror as the quality of the view would deteriorate with what's
called 'spherical aberration'. Spherical aberration would make the view look as
if you were looking into a distorting mirror.
To allow reflectors
to have low focal ratios of around F5 they use a parabolic mirror. This cancels
out the spherical aberration but until relatively recently these were very
expensive. Most modern reflectors employ a parabolic mirror which allows the
tube length to be shorter and with advances in manufacturing the parabolic
mirror is no more expensive. Its not all good news however because the faster
the focal ratio of a reflecting telescope the more demanding it can be on
eyepieces due to a condition called coma. Coma causes stars at the edge of the
view as seen by the telescope to become slighly elongated - this is corrected
in high end eyepieces but low cost eyepieces are seldom well corrected for a
fast focal ratio scope.
For the
novice these problems are more theoretical than real.
We'll look at eyepieces later in this guide.
|
|
Reflecting
telescopes can be mounted in a variety of ways but one of the most common types
is what's called the Dobsonian (named after John Dobson who came up with the
idea). A Dobsonian is simply a reflecting telescope that is mounted on a simple
turntable. This arrangement allows a very large reflector to be easily and
simply mounted. Most large reflectors for amateurs are Dobsonian mounted
because the cost of mounting a very large telescope on anything else would be
prohibitive.
Reflectors mounted on an EQ mount (mounts are discussed
later in this article) will often tend to be quite hard work as the eyepiece
can end up in strange positions requiring the user to either rotate the
telescope in its mount (which can be hard with a heavy telescope) or become
adept at Yoga. Reflectors also require a process known as collimation to align
their optics periodically. While not exactly rocket science basic collimation
is probably the second most frequently asked question on astronomy forums
(after 'what telescope do I buy ?' ). While it can be mastered with some
practice it can be confusing for beginners and carries a potentially steep
learning curve. This should not put you off however. Whatever telescope you buy
will have its own demands on the user and you will need to master many skills
in the hobby. |
| Reflector Pros - Biggest bang
for the buck in aperture - The best option for deep sky work - Simplest to use
manually (when mounted as a Dobsonian) Reflector
Cons - Requires collimation and maintenance - Less rugged than other
types - Potentially bulky and heavy when EQ mounted. |
| |
 |
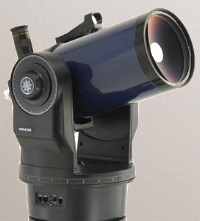
SCT
SCTs, or more correctly Schmidt
Cassegrain Telescopes use a novel method of creating a very long focal ratio by
'folding' the optical path inside the telescope. This simple idea allows for
the telescope to be rather compact.
SCTs because of their more complex optics are generally (along with
the Maksutov) among the more expensive types available. SCTs provide powerful
magnifications and light capture and generally they are good all-rounder type
telescopes. Their relatively long focal ratio makes them suitable for planets
while the larger SCTs have a light grasp equal to a Newtonian Reflector however
a side effect of their design reduces their field of view compared to an
equivalent reflector.
The picture to
the left shows a Nexstar 4SE, one of a range of low cost Maksutov/SCT
telescopes from Celestron.
Field of View (FOV)
The field of view of a
telescope is basically how wide a view it can see. Planets don't require a very
wide field whereas some deep sky objects such as nebula are very diffuse and
spread out. As a result for some deep sky objects the widest field of view is
required. SCT and Maksutov designs have much narrower fields of view than a
reflecting telescope. This isn't generally a problem to the beginner to
astronomy. |
|
|
SCTs, like
refractors, are relatively hardy but they may occasionally require collimating
like a reflector. Because of their small size (but don't be fooled they can be
quite heavy) SCTs are often the scope of choice for those requiring
portability. Also because of their short length they are the scope of choice
for manufacturers to offer with automatic GoTo style mounts.
SCTs are
nearly always the most comfortable scopes to use as their eyepiece position
stays relatively the same regardless of the direction they are pointing due to
their short length.
One of the big downsides however to SCT and Maksutov
telescopes is the long cool down time. For a telescope to meet its best optical
performance its lenses need to be at the same temperature as the surrounding
air. Most telescopes reach ambient temperature relatively quickly but because
of their closed design SCTs and Maksutov types need a longer cool down time. A
Large SCT or Maksutov may require as much as 4 hours. Another downside to the
design is under dew laden conditions very common in the UK the SCT and Maksutov
types tend to suffer worse than other types and may end up requiring dew
heaters to keep their optics clear. Dew heaters perform the same function as
the electric heated rear window in your car. |
|
MAKSUTOV CASSEGRAIN
Usually shortened to just Maksutov or Mak these scopes are similar in
looks to an SCT but usually have a much larger focal ratio making them
extremely good for planetary viewing but much less suitable for deep sky
objects (DSOs) such as nebula. Maksutovs seldom require any maintenance and
like refractors they are usually very rugged. They generally have an even
narrower field of view than the SCT type
The Maksutov design is basically a folded refractor which allows the
aperture size to increase without creating a telescope that would be unwieldy,
heavy and difficult to mount. Like the SCT type telescope Maksutovs, especially
in larger sizes, are among the more expensive designs and they also suffer from
the same problems as SCT types with regard to long cool down times and
dewing. |
SCT / Maksutov Pros - Compact and rugged - Little
or no maintenance required - Good all rounder
SCT
/ Maksutov Cons - Expensive - Highest cost per inch of aperture -
Long cooling down time - Narrower field of view |
|
Magnification - how big can you get ? How low can you go
?
Most beginners in astronomy assume that the key factor in any
telescope is how big it makes things appear. Strange as it may seem a
telescopes primary role is not to magnify but to gather light. The
magnification of any object in a telescope is largely a factor of the eyepiece
that is plugged into the telescope.
Generally speaking a telescopes magnification is limited to 2x the
size of its primary optic (either the primary mirror or the main lens.....so a
telescope with a 100mm main lens would have a maximum magnification of x200 (2x
100=200). The actual magnification is carried out by the telescopes eyepiece.
These come in a range of sizes and types but typically a telescope would be
supplied from the manufacturer with something like a 10mm and a 25mm eyepiece.
The eyepieces magnify an object
based on the telescopes focal length divided by the eyepiece size. So for
instance a telescope with a focal length of 1000mm with a 10mm eyepiece would
give magnification of x100 ( 1000/10=100) while the 25mm eyepiece would give
x40 (1000/25=40mm).
So how
big can you get ? Theoretically a 200mm (8") Reflector can achieve x400
magnification but in reality the seeing conditions of the sky are the limiting
factor and quite frequently the maximum achievable is no more than x200. EBay
and store type telescopes promising x700 are blowing smoke and are best
avoided. |
|
| |
| TELESCOPE MOUNTS - What's the difference
? |
Like telescopes
mounts come in a wide variety of types with various features. A general rule is
always buy the biggest mount you can afford for your telescope. No one ever
complains that their mount is too steady.
The quality of the mounting
can have a huge effect on the quality of the views. A wobbly mount will never
allow you to exploit the full potential of your telescope and will only ever be
a cause of frustration. Manufacturers usually package telescopes and mounts
together in various combinations and to get the price down they will sometimes
package a telescope with an underspecified mounting which means your beautiful
big telescope will never be allowed to perform well.
This section will
explain the basic mounting types. Its not a fully comprehensive list but covers
the main mounting types that are commonly available.
|
 |
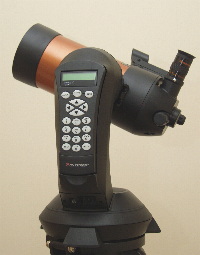
ALT / AZ
Alt Az (short for altitude-azimuth) is the simplest of all telescope
mountings. It's designed to allow the telescope to point up and down and left
and right.
Alt/Az mounts come in various forms ranging from something which
looks similar to a camera tripod through to fully automated GoTo systems using
a forked mounting. Generally speaking Alt/Az is mostly used for SCT and
Maksutovs when coupled with a GoTo mount.
The picture to the left shows
a modern small SCT telescope on its Alt/Az mount. This is a Meade ETX series. A
popular small scope with a GoTo controlled mounting
Alt/Az Pros - Simple to understand and use. Fast set-up
when not automated.
Alt/Az Cons - Can end up being a pain when you
realise how fast celestial objects move and how tough it is to track them
(manual mounts only). |
|
|
EQUATORIAL
(EQ)
The Equatorial mounting (more properly called a German
equatorial mount or GEM but most often referred to as an EQ) is the standard
mounting for many types of telescope. The advantage of a standard equatorial
mount over an Alt/Az is that the mounting is designed to track the motion of
the stars. Once properly aligned to the pole star the mounting can be moved
using a single slow-motion control to track the stars. These are commonly
motorised to allow the mount to automatically follow the star. This is not the
same as GoTo and only allows the mount to move at the same rate as the stars to
track objects. It doesn't help you find them !
The advantage of the EQ style mount is offset by the fact that it's a
relatively complex piece of equipment and there are no shortage of beginners on
astronomy forums asking for help using these. If you have any interest in
progressing to astro-imaging then this is the mount for you because you will
sooner or later have to use one if you intend to do astro-imaging.
Another
downside is the bulk and weight of an EQ mount. To adequately mount a larger
telescope the EQ mount size increases AND it requires counterbalance weights
which can easily hit the scales at 10kg-15kg which, when combined with the bulk
of the mount itself can add up to a hefty weight of gear. EQ mounts come in a
vast range of sizes from the small Sky-Watcher EQ1 for small telescopes through
mounts costing many thousands of pounds.
|
 |
Some people prefer EQ
mounts for observing as the convenience of having the mount track objects makes
for less hassle when observing. . Any type of telescope can be used with an EQ
mount but very large reflectors usually employ a Dobsonian mounting as the cost
of an EQ mounting would be prohibitive.
EQ mounts are a must for
anybody wanting high magnification on planets. Planets tend to move quite fast
and if you are endlessly having to move the telescope it can be a bit like
chasing a chicken. Eache movemt will cause the telescope to wobble slightly and
by the time the view has settled down you need to move again to keep the planet
in view. An EQ mount with at least a motor for tracking will make the whole
experience less frustrating. Its also very useful if you have a child or other
observers in mind. Without it as you change places at the eyepiece the object
may well have moved out of sight each time leading to a frustrating
experience.
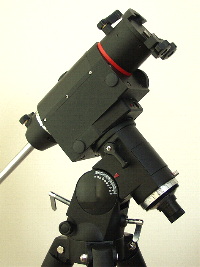
The picture shows the Skywatcher HEQ-5 equatorial mount
- a popular medium sized mounting which provides motor driven controls,
tracking and is most often equipped with GoTo.
Equatorial (EQ) Pros - Makes it easier to follow
celestial objects, a must for planets.
Equatorial
(EQ) Cons - Beginners are often confused by EQ mounts due to their
relative complexity, Heavy. |
| |
 |
DOBSONIAN
The
Dobsonian mount is basically a simple turntable that supports the telescope and
allows it to point up and down. It's essentially an Alt/Az mount designed
solely for large reflecting telescopes. This method of mounting is almost only
ever used for reflectors and is, for the amateur, the most practical method of
mounting large heavy reflecting telescopes.
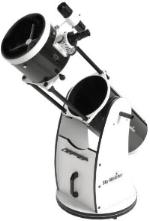
The picture shows a
Sky-Watcher 'Flextube' Dobsonian. A popular choice which provides a relatively
low cost, large aperture telescope which can fold down to a smaller size for
storage and transport.
Dobsonian Pros -
Simplest mounting of them all and the most cost effective for larger telescope.
Fast set-up (manual only)
Dobsonian Cons
- Some users find constantly having to nudge the scope to follow objects
difficult and/or annoying. |
|
| |
GOTO
GoTo is not so much a mounting as an add on
to other mount types or a system built into the mount at the factory.
GoTo consists of motors, a motor controller and a handset which contain
the electronic elements to automatically align the telescope to any celestial
object. They normally contain databases of around 15,000-40,000 objects. Bear
in mind many small telescopes sold with a GoTo mount may well have a directory
of 15,000 objects but chances are only a very few will be viewable because of
the small size of the optics of the telescope.
GoTo can be applied to
almost any style of mount but it's most normal for manufacturers of SCTs on
fork mountings to supply GoTo as part of the basic mount specification. On EQ
mounts it can be added onto some manufacturers mountings or can be built into
the mount. Recently some manufacturers have created GoTo Dobsonian mountings
but these are, at the present time relatively rare. However, Dobsonian mounts
may have what's known as 'Push To' whereby a controller will tell you where to
point the telescope but you have to push the telescope to its position.
Don't be fooled though by assuming GoTo is the answer to a beginners
prayers. Paradoxically GoTo can be a relatively complex set-up in itself with
its own steep learning curve to master and when applied to an equatorial
telescope it may require you to be able to identify stars as part of the
alignment process.
GoTo Mount Pro
- Easy to locate objects and track them. Can be a boon for the novice.
GoTo Mount Con - Can be a learning
curve in its own right, small scopes may sacrifice optical quality for
electronic wizardry. |
| |
GoTo Hell !!!!
GoTo is often a bone of contention
among amateur astronomers. Some will argue that GoTo removes any skill and
kills the excitement of finding objects for yourself. Others will argue that
GoTo opens up the sky for beginners. Which solution is right is down to the
individual.
I have seen beginners start the hobby determined to learn
the sky and do without GoTo who have ended up giving up the hobby in
frustration. The general poor weather in the UK can limit available nights for
seeing and when that is coupled with other commitments ( family, work etc) it
can reduce the available time to learn the sky to a bare minimum and lead to a
large amount of frustration when you have a large scope but cant ever find
anything to look at. Alternately I have seen others start the hobby with GoTo
and find that it lacks any thrill. Simply pressing a button and letting the
scope do all the work can kill the thrill for some people. Which one is right
for you depends on how much time you wish to devote to the hobby.
One
thing you should be very clear about though is that GoTo is absolutely NOT like
using your home DVD player or other household electronics which are
'automatic'. GoTo nearly always requires a reasonable amount of skill from the
user to get it set up correctly.
Don't allow any 'snob' attitudes to
dictate your choice on GoTo - be realistic in your expectations of how often
you will be using your telescope and budget and buy accordingly. Heaven or Hell
with GoTo is a very individual choice and experience. |
|
| |
| EYEPIECES - The heart of any
telescope |
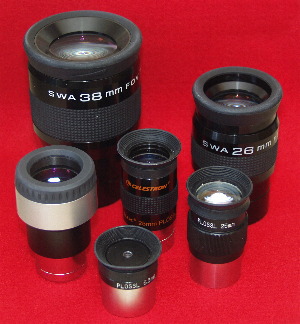 |
Pictured a range of eyepieces in 1.25" and 2"
fittings from Vixen, TAL,
Celestron and Skywatcher. |
|
The eyepiece of a telescope is the bit you actually look
through. On an astronomical telescope these are usually removable.
The
eyepiece, coupled with the telescopes focal length determine the magnification
of the view . Beginners to astronomy are very often perplexed by eyepieces but
its really quite simple.
Eyepieces come in a big range of types and
sizes but most usually their size is given as their barrel size which is
usually 1.25" or 2" and their optical size which will be expressed as
millimetres - this is the eyepieces focal length.
The focal lengths of
eyepieces vary from 2mm to 40mm for astronomical telescopes. The barrel size is
to accommodate a wider angle view but not all telescopes have a focuser that
can accept a 2" fitting or could not make use of it if they did. Similarly high
powered eyepieces have a narrow field of view so are seldom supplied in a 2"
fitting as they would not benefit from it.
Generally good quality
astronomical telescopes have a fitting for an eyepiece that's in line with
their capabilities.
The smaller the focal length of the eyepiece the
more the eyepiece magnifies the view (see the section above on magnification)
and this is an area where many beginners make their first big mistake in
astronomy (see the section below). |
|
Bigger IS NOT better !
Most beginners assume that
the thing to have in a telescope is MASSIVE magnification and quite often
beginners will rush out and buy the eyepiece which will give them x400
magnification and then find its completely unusable.
The fact is that most astronomy is carried out at no
more than x200 and quite often less than that ! Weather is the biggest factor.
As magnification gets bigger so does the view, unfortunately so does the
disturbance in the atmosphere. This can reduce a high powered view to looking
as if your viewing through running water. The other factor is the telescope
itself. The maximum magnification any telescope can take is 2x for each mm of
its aperture. So a typical starter scope with a 130mm aperture only has a
maximum magnification of x260. In reality many scopes don't perform well at
better than 60% of their theoretical maximum so a 130mm scope is seldom
adequate for more than x150. Obviously the quality of the optics comes into
play here and a good quality telescope may well be able to exceed its maximum
stated performance while a poor quality telescope may very much under-perform
against its theoretical ability.
For all these reasons beginners are often disappointed with a high
powered eyepiece. Astronomers generally place a bigger premium on wider angle
views using 10mmm - 30mm eyepieces for deep sky viewing. High powered eyepieces
are generally only used for planets and the moon and even then conditions are
seldom good enough in the UK to go to much higher than x200.
High
powered eyepieces are also, for many people, uncomfortable to
use. |
|
Eyepieces are a
very complex topic and this article is really only to acquaint you with some
basics. Your telescope will almost certainly come with an eyepiece or two from
the manufacturer along with a Barlow lens. These are seldom the best quality
eyepieces but are there to get you started. A Barlow is a special kind of lens
that doubles the magnification of any eyepiece thats used with
it.
Faster focal ratio scopes of F5 and below will be more demanding on
eyepieces to get the very best views due to a condition known as coma which
causes the 'fast' optical design in some refelectors to create elongated star
shapes. Don't however let that put you off. Most beginners are perfectly happy
with the views through only low and medium costs eyepieces from quality
manufacturers with scopes of around F5. Higher speed scopes down to F4 can
however be VERY demanding and the quality of views may suffer with anything but
the best quality eyepieces.
Eyepieces can range in price from £10
through to £600 !!!!!!. The difference is in the optical quality and the
eyepieces ability to keep the view free from any optical defects. It seems
expensive but in reality an eyepiece is like a lens for a camera. Cameras are
often quite relatively inexpensive but good quality lenses are mostly very
expensive. It's the same relationship between a telescope and a camera. Just
make sure that when you buy your telescope it comes with at least fittings for
1.25" eyepieces.
One of the buzz words you will hear when talking about
eyepieces is 'eye relief' this is the distance between the glass of the
eyepiece and your eye. If the eye relief is too far away you will feel as if
you are standing back and looking down the barrel of a ballpoint pen. If its
too close you wil find it uncomfortable, and if you wear glasses, perhaps
impossible. The more powerful the eyepiece becomes (shorter focal ratio) the
less eye relief there will be. Thats another reason why beginners are often put
off with high powered eyepieces.
As time goes by and you
acquire experience you will know what types of eyepieces will be good for both
your telescope and for you. |
| |
| ASTRO PHOTOGRAPHY |
One of the big
things that often brings beginners to astronomy is astro-imaging and the idea
of taking some fantastic photographs of nebulae and galaxies.
Its also the
fastest way out of the hobby for many people !
Years ago when I started
astronomy in the 1970s astro imaging was technically challenging, complex and
expensive. Heres the news - it still is ! If you think your going to bolt your
new digital camera to a telescope and get NASA quality pictures like you see on
the web and in magazines then think again.
Most of the pictures in astronomy magazines and books were taken by
people with multi thousand dollar set-ups and the techniques have likely taken
them years to master.
If however, you have decided astro-imaging is the be
all and end all I could only recommend you get a good beginners guide to astro
imaging such as Steve Richards very excellent book
'Making
Every Photon Count' which is considered excellent by no less a personage
than Sir Patrick Moore himself.
Astro imaging is a science
bordering on a black art which is a vast topic with very many complexities but
Steves book will give you the best possible start and its written with complete
beginners in mind with plenty of pictures. Steve covers everything you will
need to know to get you started and to give you an understanding of the
challenges and the equipment involved.
Generally speaking astronomy is a steep learning curve without
introducing the complexities of astro-imagine and I would advise any beginner
to learn the basics first before attempting to jump in to one of the most
technically challenging aspects of the hobby.
|
 |
|
| |
| WHERE TO NEXT..... |
Many astronomers
when asked will suggest getting involved with an astronomical society. While a
good local society can be very advantageous there are also rather dull
societies and some, sadly, have the sorts of people who would put you off for
good.
I'd suggest get online - you
found this article so click around and find an online bulletin board like
stargazers lounge. You'll find
plenty of friendly folk in there who will help.
Astronomy is more than
kind to beginners and older, wiser heads can advise, help and share knowledge.
There's very little snobbery in astronomy so don't be afraid to join in on a
web board and ask questions.
The next best resource for
the beginner is to look out for star parties or public events you can go along
to. Astronomers are very often incredibly generous with their time and this
will allow you to get a look through a few different telescopes and form a
better opinion of what you need.
Finally a good resource that is often overlooked is a good
dealer. Reputable dealers will talk you through the pitfalls and help you
choose a telescope that's right for YOU. Remember not every scope is
perfect for everyone and you need something that you like and will use.
Reputable dealers can talk you through the issues and advise you and most
importantly be available to take support calls if you have problems.
I
wish you luck and clear skies in your forthcoming astro adventures. |
| |
| Back to the Astro Baby Home
Page |
| |
|
|