 |
|||||||||||||||||||||||||
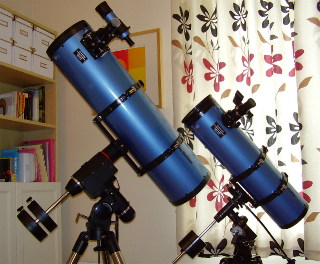
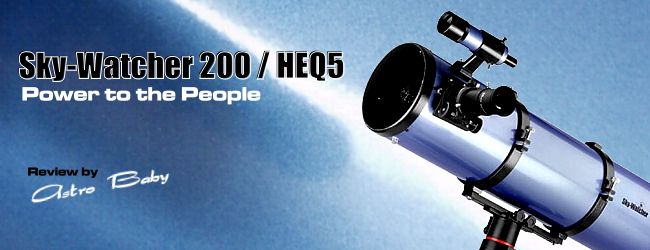
| Background Having re-started in astronomy with the Sky-Watcher 130PM I quickly found myself wishing for a larger telescope and decided to upgrade to a bigger aperture Newtonian. The 130PM had confirmed to me that my primary interest was going to be deep sky observing and a Newtonian made sense to me. Sky-Watcher equipment seemed to attract good reviews and even a recommendation from Sir Patrick Moore !!! I had bought the little 130PM as a kind of test purchase to see if my interest would be sustained and also if a Newtonian scope from Sky-Watcher would be of good quality. Having been out of astronomy for such a long time my previous knowledge was rusty and I needed to assure myself of the quality of the equipment and also decide whether a Newtonian scope was indeed the best choice. Over the intervening years equipment has changed considerably. There was also a profusion of unfamiliar manufacturers and telescope types and I found myself in the same position as any other beginner of being very unsure about what I wanted to do. Many years ago when I started astronomy the choice of almost every serious amateur was a Newtonian. Back then SCTs were priced outside of the reach of most amateur astronomers and I can't ever recall even seeing one back in the 1970s other than in glossy adverts and scientific journals - usually at a university or professional observatory. The little Sky-Watcher 130PM had turned out to be a great scope and I can't speak highly enough of its overall quality for what is after all an entry level scope for beginner's. On the strength of a few months use of the 130PM I resolved to upgrade and found myself ordering a Sky-Watcher 200P on an HEQ5 mount. The scope seemed to be very popular with other amateurs and in part my decision was based on the fact that 20 plus years ago the 8" Newtonian was a scope to be reckoned with - king of the hill. Back then I could never have afforded such a large telescope or such an advanced mount but now with prices having fallen hugely and me being in late middle age I decided to own the sort of scope I always wanted way back then. I didn't buy the GoTo version as I prefer to find objects myself although the HEQ5 can be upgraded later on if required. Now I must admit a certain prejudice here. I do like Newtonians. That's partly based on my experiences many years ago but also based on the 'purity' of the design. It's simple, ingenious and very clever. It looks less so now that we have had a few hundred years of Newtonian scopes but it's still a marvellous design. The Sky-Watcher 200P / HEQ5 The Sky-Watcher 200 was ordered up and I settled back to wait for a delivery. When it came I was somewhat amazed at its physical size. Three huge cardboard packing crates that had a hefty amount of weight. On opening the carton containing the tube I was aghast at its physical size. A long time out of astronomy and only the 130PM to gauge sizes against had led me to think the tube would be quite a bit smaller. On first sight it was a monster ! The packing crates containing the mounts head, tripod and weights all reinforced this view and I was torn between a lot of joy at owning the sort of set-up I could only have dreamed about years ago and the fear that it was so large perhaps it would be beyond me.
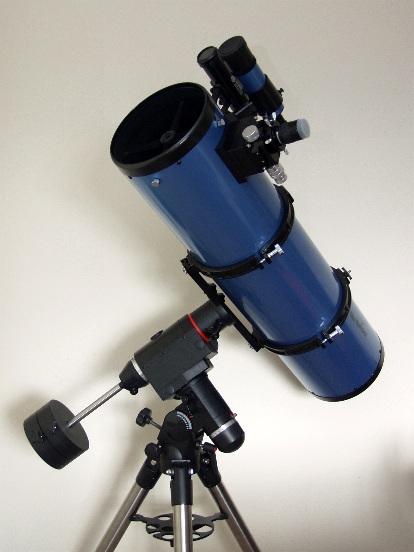
The focuser was seriously defective with glue and sticky paper stuck in the mechanism, the optics were badly misaligned, the primary mirror cell was loose in its cell. Along with the problems with the OTA the mount also showed some serious defects. These included a damaged polar scope and a non-functioning DEC drive. I was very disappointed as the 130PM had been excellent. The dealer was lacklustre in responding to my enquiries for a replacement so I called Optical Vision - the distributor for the Sky-Watcher brand in the UK - they were on the case very quickly and arranged a replacement scope. Their customer service was first class. I always believe the real test of a company is how well they respond to a customer problem because lets face it the company that has NEVER had a problem with its goods hasn't arrived yet and probably never will. Note: In fact the issues with the scope were quite long and drawn out thanks to poor service from the dealer but rather than create a review which lists a blow by blow account and very aggravating time I have cut this episode down in this review to its bare bones. It's sufficient to say that when Optical Vision got involved all of my problems were resolved very quickly and I would have no hesitation in recommending Sky-Watcher equipment based on their superb customer service. Talking to other owners it would appear that I was merely unlucky and surprisingly few other problems seem to ever have been reported with Sky-Watcher equipment. The replacement scope arrived and was found to have a few minor issues I wasn't happy with - these included a loose finder scope mounting which was easily resolved with a screwdriver and a pair of pliers. The mounting bracket was also loose on my 130PM when it arrived and this seems quite common from other reviews of all kinds of telescopes. The primary mirror clips were loose and I tightened these up. Collimation was way out of alignment most likely due to the loose primary mirror retaining clips. All of these issues are relatively normal with larger Newtonians and any owner of one of these should be able to collimate and deal with this kind of minor maintenance. The 200P telescope when assembled and in fully working order was impressive indeed. It's physically very large as already stated but the overall mechanical fit and finish was superb. The tube is rolled aluminium which is strong and light with neat seams. The factory fitted Crayford style focuser was smooth and sure and very nice for a budget focuser. The 9x 50 finder scope was stable, well mounted and very bright. The real star of the show though was the HEQ5 mount. It is indeed a very solid piece of engineering that fits the bill nicely as a large and stable yet portable mount. The tripod with 1.75" stainless steel legs coupled to the HEQ5 mount head held the scope very firmly. The mount when slewing was almost silent - so much so that at first I wondered if it were working at all.
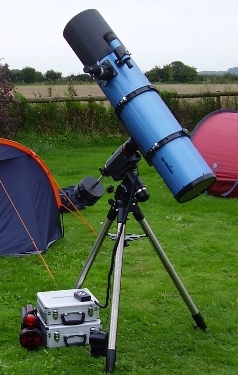
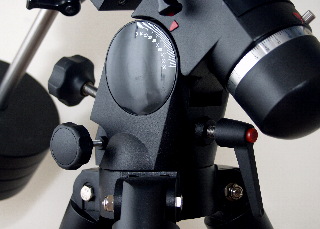
Learning The Ropes The Telescope itself was very straightforward to set up and no more complex than any other telescope. The HEQ5 mount however posed a few additional complexities. Never having owned a mount of similar sophistication I found myself a little lost. A manual is available from OVLs website but the Polar scope set up instructions from Sky-Watcher were quite hopeless and indeed there were many items not covered in the instruction manual including how to focus the finder scope and the polar scope. The polar scope setting circles while essentially simple seem to confuse many beginners including me. Indeed I had such a time of it I wrote an internet guide to hopefully help other tyros with the HEQ5. The RA setting circle also has its own oddities with its lock screw which will only lock the circle at '0'. There is a good reason for this in polar scope calibration but to a beginner it was a bit confusing and added to a nasty feeling that I may be out of my depth. After having learnt how to get the polar scope aligned and configured I felt a lot more confident. The telescope itself also required collimation from the start. This in itself presented challenges and over the course of a few weeks I was forced to learn how to collimate rather well. This was a good thing in the long run but at the time seemed rather frustrating. Other Sky-Watcher owners have told me I probably got unlucky here and the second scope may well have suffered problems because of poor handling by the courier. All in all the learning slope was very steep but looking back I am grateful for it as it forced me to learn an awful lot very quickly and become pretty well expert at collimation. A more experienced telescope user may have been faster at setting the telescope up. I had some collimation experience but not nearly enough and fast Newtonians have their own peculiarities. The knowledge I gained helped me write my own guide to collimation. Fettled After a few weeks of fiddling about with the telescope and learning how to align the Polar scope fully while waiting for the clouds to clear I finally had an opportunity to see some stars with it and used the time to test the collimation. Regrettably the weather very quickly closed in and the opportunity to do any observing wasn't to present itself again for quite some time. The time spent with no clear weather was put to good use learning the scope inside out and practicing with it. I knew from past experience this would pay dividends when I finally got to the sue the telescope under an ink black sky. First Light A Star Party at Salisbury finally gave me a chance to test the telescope out under near perfect conditions. First off I got time to do a serious bit of star testing to check that the optics and collimation were spot on. This proved to be the case even though the scope had been bumped over some bad roads on the way down. So collimation had held up even under stress. Secondly I got the first real chance to check whether the polar alignment setting circles were correct and the reticule well aligned. Despite the fact that I forgot to do a final retest using Polarview so the circles were calibrated as per their original set up some months prior to the Star Party the Polar alignment worked perfectly with the scope tracking with almost no visible error for observational use. I periodically rechecked the alignment and found each time that Polaris was tracking around the polar scopes tracking circle perfectly over 3-4 hours. The tracking was a real boon with other people using the scope and at one point the scope was left unattended for about 40 minutes and when I returned the Ring Nebula was still perfectly centred from where I left it. That might seem no big thing to more experienced users of the HEQ5 but to me whose previous mounts were somewhat less sophisticated it was an amazing thing not to have to keep jiggling the mount. Remember I was last doing this 20 plus years ago and mounts like the HEQ5 were unattainable for me then.
The scope was then cranked around to find in succession M57 (The Ring) and M27 (Dumbbell Nebula). The views while good were very faint which is typical of many DSOs. Experienced astronomers will doubtless know that these objects are very small targets and always look unimpressive compared to photographs of the same objects. None the less the Ring was a real find as I had never observed it directly before and I was quite elated that the 8" would show it quite well. It may sound as if I was unhappy - far from it - these are very faint targets and getting to see them as well as I did was very impressive. A UHC filter may have improved the view but I didn't have one with me. I then moved the scope to the double cluster in Perseus. I had observed it the previous night through a 12" Dob with a Televue Ethos 13mm - very much the Rolls Royce of DSO viewing equipment for observing and was curious to see how the 8" would fare with the new Sky-Watcher 38mm Panaview EP in place. In short extremely good. The wide angle of the Panaview (70') with its less powerful magnification gave a very good view. Both clusters would fit in the EP view (just about) along with the surrounding stars. The view almost shaded the view of M13 earlier. Other observers were in fact more 'wowed' by the double cluster through the SWA 38mm. The final target for the night was the Pleiades. An easy target but by this point I was getting tired and cold and lacked the energy to try and locate another hard target. The Pleiades as I would have expected showed up very well in an 8" scope and with the SWA 38mm Panaview in place looked very impressive indeed and even showed a little faint nebulosity. Across the night I tried a range of EPs on various targets although seldom more powerful than 15m (which would be typical magnification for most DSOs in my experience) and found the scope performed brilliantly well - far beyond my expectations. The focuser that came with the scope was the Sky-Watcher Crayford style unit and I found very little to complain about with the Sky-Watcher unit which did its job rather well. There is a small amount of slop in the mechanism and it's nowhere near as smooth as some of the after market upgrades such as the Moonlite or Baader Planetarium but it's still incomparably better than the rack and pinion focusers I have used in the past and a real boon. Across the night with a range of EPs it was easy to get focus with the minimum amount of wobble transmitted to the scope. The HEQ5 was outstanding, unobtrusively tracking with no noise and no fuss. Just quietly getting on with its job of tracking perfectly and providing a perfectly stable mount that was easily able to keep the 200P in its grip. I was a bit concerned that with the heavy dew problems its electrics might suffer but it slogged on even when running with water by the end of the evening. The perfect running partner I think to the 200P. My only real gripe ( and this is hardly the fault of anyone but me ) was that under a perfectly dark sky I found the 9x50 finder almost useless. My sky navigation isn't the best and I found the finder ended up with so many stars in it I could hardly tell where I was by using it. This is really down to my poor stellar navigation and rusty star hopping skills. The item which proved the most useful through the night (and is an absolute must for Newtonian owners) was the Orion dew shield for the scope. The scope only occasionally suffered dew on its finder scope and the cheap dew shield kept the main optics clear of wet stuff all night. Verdict Happy ? You bet - convinced that for me the 200 on the HEQ5 was the right combination as I hoped it would be. A good mix of powerful optics and a stable and reliable mount which when set up will provide perfect tracking for an observer. Brilliant and smooth running mechanics coupled with great optics and most important of all views that made all the initial problems see like the minor niggles they in fact were. In fact as a postscript the initial issues actually helped under dark skies. I was completely familiar with where everything was and quite able (had the need arose) to collimate on the fly. I just cant wait for some dark winter skies to get going observing again and use the SW200 to its maximum potential which I am sure I have just scratched the surface of. The 200 when mated to the HEQ5 provides a kind of astronomical 'sweet-spot' - much smaller and a telescope will struggle with faint objects, much larger and a reflector can become unmanageable for anything other than an observatory. Cost wise and functionally the 200/HEQ5 is right on the money. A very powerful and versatile scope thats easily within the budget of an amateur astronomer. Having used the scope I can easily see why its such a popular system - it brings incredible views in a relatively compact and well thought out package that wont break the bank. In a nutshell - Power to the People ! __________________________________________________________________________________ Upgrades While the SW200P/HEQ5 provides powerful out of the box capabilities I knew when I bought it I would be upgrading parts of the telescope. I have carried out a range of modifications / upgrades. There are outlined below along with pictures. HEQ5 - Alt-Azimuth Bolt Replacements The bolts supplied with the HEQ5 are notorious for bending as the metal is too soft. This can cause a real problem with the mount over time and so I decided to upgrade the bolts early on to prevent bigger problems later. The replacement set of alt-az bolts from Astro Developments are made of stronger steel with more ergonomic knobs. The ratchet type bolt under the polar scope is much easier to adjust than the Sky-Watcher supplied bolts. The Astro-developments bolts also look better.
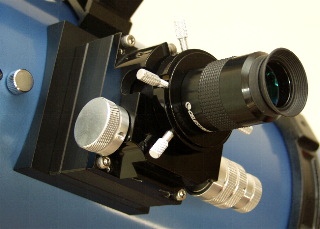
HEQ5 - Screw replacement Along one side of the mount Sky-Watcher used chrome headed screws. These seemed to clash with the black color of the mount so I have replaced these with blackened screws. It just looks nicer. HEQ5 - Index Marks As delivered the index marks for the Latitude scale and RA scale are moulded items on the mount and have no colour. I carefully touched these in with white enamel paint and then over painted with a deep red. Undercoating with white helps the red show up a bit better. Cosmetic only but they make the mount look a little more classy. HEQ5 - Weight Bar Extension The original weight bar with the mount is designed to collapse into the mount for transport. It's a nice idea and with a completely unmodified scope the bar is long enough to balance the scope. With any modifications to the scope the weight bar is too short which means either more weights or an extension to the weight bar. The Moonlite focuser and the red dot finder pushed my set-up past its balance point and I plumped for the extension bar as its less overall weight to carry around. SW200 - Moonlite Focuser While the Sky-Watcher supplied Crayford worked perfectly well I was unhappy with the amount of slop in the focusers eyepiece collar for collimation purposes and resolved to have a compression fit focuser to overcome this. I also wanted something that had higher precision. I opted for a Moonlite dual rate Crayford. This is a simple swap out fitting. In fact I found the holes that were drilled in the tube were slightly out of alignment for the Moonlite. These was handled by enlarging the holes slightly. The Moonlite is a superb piece of precision kit and makes collimation much easier as well as providing silky smooth focusing.
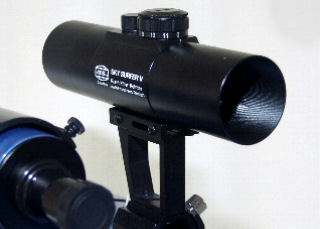
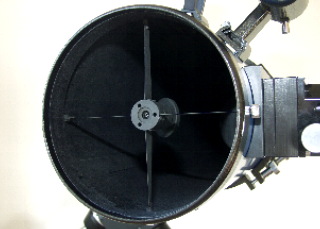
SW200 - Baader SkySurfer V Red Dot Finder As already mentioned in the review I found the 9x50 finder very hard to deal with and resolved to have an accompanying red dot finder. The Sky-Surfer V is a well made piece of kit of all metal construction, comes with a dewshield attachment and clear see through lens protection caps. I opted to buy another Vixen accessory bracket so that the red dot finder and the 9x50 can be mounted side by side. SW200 - Flocking I have flocked the inside of my tube using Protostar flocking paper. This was a simple enough job and provides a totally light absorbent inner surface to the tube. As part of this process I have also painted all internal metalwork with International Paints Blackboard paint including the secondary mirror holder and surround and the spider vanes. The flocking will improve the contrast on views.
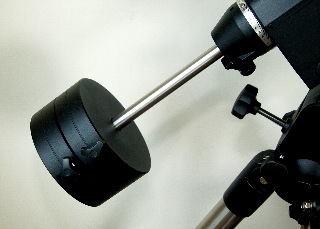
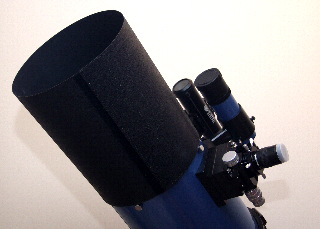
SW200 - Orion Dewshield More of an accessory than an upgrade but this piece of equipment is priceless. A simple piece of equipment that keeps dew away from the secondary mirror which is essential in the UK climate. __________________________________________________________________________________ |
|||||||||||||||||||||||||
|
|
|||||||||||||||||||||||||
| Back to Astro-Baby Home Page |