|
Astro Babys Guide to Collimation

This guide will take you through the various steps towards perfect collimation. I have included both diagrams to show you the ideal as well as pictures showing how it will actually look as beginners are often confused between the idealised views of a well collimated telescope and the views they are seeing with their own equipment.
The scope being collimated in these pictures is a Sky-Watcher 200P with an aperture of 200mm and a focal length of 1000mm (Focal Ratio f 5). This is a common enough fast reflector and the collimation process is essentially the same for any Newtonian telescope. Where there are differences between a fast scope and a slow (high f number) scope I have provided text and pictures to highlight the differences.
Fast telescopes are typically of around f5 to f3 or even faster. You can calculate the focal ratio of your own telescope by the simply dividing the focal length by the diameter of the primary mirror. The Sky-Watcher 200P has a focal length of 1000mm and a primary mirror diameter of 200mm so 1000 divided by 200 = 5 ( focal ratio ). Slow telescopes are usually at f6 – f7 or slower.
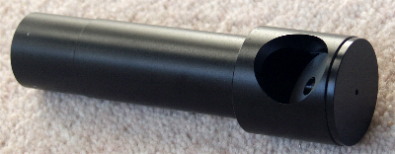
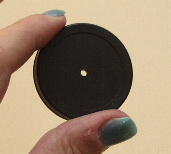
 To accurately collimate with this guide you will need a Cheshire collimator and a collimation cap. My own collimation cap is made from a focuser blanking cover with a small hole drilled through the exact centre. You can make a collimation cap from a 35mm film container or buy them ready made.
I have not covered collimation with a laser because my own experience has been lasers seem to create more problems than they solve as they also require collimation which isn’t always possible with some low cost lasers. Lasers generally only work well in telescopes which have a high quality focuser with minimal ‘slop’. The average mass produced telescope very often has a focuser that is too imprecise to make use of a laser.
This guide may look scary – if you take it one step at a time its not that hard. In order to cover off all of the issues the guide is somewhat larger than some others on the web – many guides omit various details which can lead to confusion and frustration in the beginner.
To collimate the telescope it should be aimed towards a bright but not glaring surface such as a well lit pale painted wall or fabric in order to get a good image in the telescope and the Chesire should be arranged so that its shiny angled surface gets a good light. Cheshire @ Amazon
For Astro Babys Guide to Cleaning and Center Spotting Telescope Mirrors Click Here|
Cheshire Collimator |
A Collimation Cap |
Tips before you start …..
Rule 1 – Before starting collimation don’t assume that anything is out of kilter and check each element before adjusting anything. About 90% of collimation errors are down solely to the primary mirror so don’t jump in and start meddling with the secondary unless you are sure that there is a problem. Each stage of this guide will show you how to check the various elements – only if they are out of alignment will you need to make adjustments.
Rule 2 – Make sure you have all of the tools you require ready to hand. Some telescopes will require Allen keys and a screwdriver. You don’t want to be looking for tools when you halfway through collimation.
Rule 3 – Make sure you have budgeted for enough time. Collimation can be a very time intensive process for a beginner. It can be carried out over successive sessions if you need to but don’t plan on collimating on a night when you want to be observing. It will lead to a rush job and frustration – TAKE YOUR TIME and you will be rewarded with good collimation and better viewing through your telescope.
Rule 4 – Do not over-tighten nuts and adjusters. They need to be firm and tight – they DON’T need to be tightened until the threads pop.
Rule 5 – Whenever you are working on a telescope ALWAYS work with the telescope tube in a horizontal position. If you drop things into the tube you don’t want them to impact on the primary mirror. I also wear cotton gloves when I am working to make sure I don’t damage anything with sweat from my hands.
| Collimation Step 1 – The Spider Vanes and Secondary Mirror Holder |
Before attempting to collimate the secondary mirror it’s essential to get the mirrors holder central to the tube and the primary mirror. Some scopes allow adjustment of the spider vanes. If your scope has this facility you need to check whether the secondary mirror holder is held perfectly central by the spider vanes.
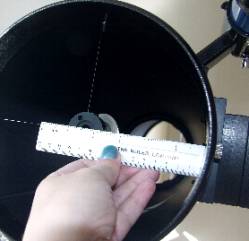
There are two methods to accomplish getting the mirror holder central to the tube. The first is relatively simply which is to measure the distance between the tube and the secondary mirror holder along each of the vanes. The distance should be identical for each vane. If the vanes are not equal than adjust them using the vanes attachment / adjustment screws. The cross head on the central screw makes an ideal reference point.
|
Measuring the spider vanes |
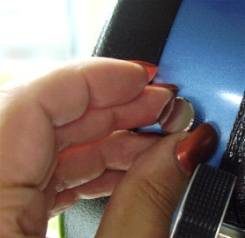
Adjusting the spider vanes |
The second method for aligning the mirror holder is a little more complex but more accurate and easier once the initial work is done.
Cut a piece of card out which is the same diameter as the telescope tube and drill a small hole in its centre. To find centre on the circular piece of card fold the card into quarters. The point where the folds cross is the centre. Now look through the hole and the central screw on the secondary mirror holder should be exactly underneath. If it isn’t adjust the spider vanes until it is. This provides a simple and reliable method of getting the mirror holder central and once you have made the piece of card future centering of the vanes will be easier.
To adjust the vanes you will need to slacken the screws and then slowly tighten them in turn to pull the mirror holder to the centre.
| Collimation Step 2 – The Secondary Mirror / Focus Tube Alignment |
The hardest stage of collimation is the secondary mirror alignment. This is almost always very time consuming but once done should not need readjustment unless the scope is severely shaken or dropped or the vanes and the secondary are removed for any reason.
The easiest method to align the secondary mirror is with either a collimation cap or a sight tube. With my Sky-Watcher 200P I find a collimation cap is the better solution as a sight tube or my Cheshire do not allow me to see the very edges of the secondary mirror through them.
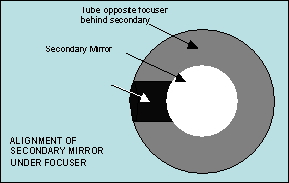 The first object of secondary mirror alignment is to get the secondary mirror directly under the focus tube and appearing as a circle. The secondary mirror is an elliptical shape but when presented to the focuser at the correct angle will appear as a perfect circle.
Many people find the reflections in the mirrors confusing and in truth it can make this stage of the process quite hard as your eyes can be confused by the multiple reflections between the secondary and primary mirrors which can create a kind of optical illusion which can make it hard to assess whether the view is circular or elliptical.
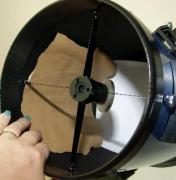
A simple solution is to use a piece of white card or paper to block the primary mirrors reflections.
Simply insert a piece of white paper into the telescope tube between the secondary and the primary mirrors. This will create a view of the secondary as just a white circle. Another tip here is that it’s often quite hard to see whether the secondary is presenting as a circle against the black background of the tube. I insert a piece of coloured card or paper behind the secondary which allows my eyes to more readily detect whether the secondary is appearing as a circle and is centred to the dark circle created by the edge of the focuser.
This is shown in the pictures below.
|
White card inserted into telescope |
Coloured card applied to scope tube |
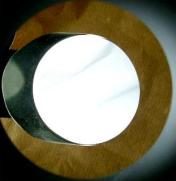
View through |

If the secondary is not centred under the eyepiece you will need to adjust it using the centre screw of the secondary holder.
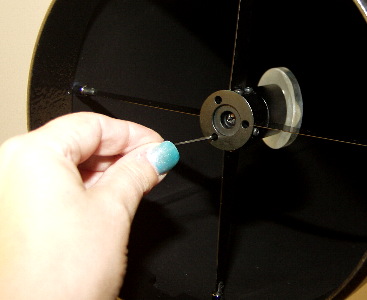
This is shown below. You are advised to have the telescope tube near the horizontal position while you carry out this work in order to ensure that if there is an accident the secondary doesn’t fall down the tube and into the primary mirror. Keep a hand holding or supporting the secondary mirror holder without touching the mirror surface itself. Proceed with great care and caution and take your time. The adjuster screw is quite coarse and the mirror will move quite a lot with each turn. Be careful not to loosen the screw too much which will cause the secondary to disengage from its holder and fall off.

The centre screw adjusts the secondary mirror both up ( away from the primary mirror ) and down ( towards the primary mirror. To adjust this you may have to loosen the screws or Allen keys which control the tilt of the secondary mirror. These are also visible in the picture to the left. Be careful not to apply too much force and go slowly.
 Then use a collimation cap in the focuser to force your eye central to the focus tube and rack the focuser tube as far out as possible.
Now move the mirror up or down the tube using the central adjusting screw on the mirror holder until you have the secondary mirror centred.
You will also need to rotate the mirror until it presents as good a circle in the focuser as possible and adjust the tilt screws to to achieve a good circular shape on the secondary.
 You should eventually get to a view which is similar to that shown on the left – this view is not perfect as it was taken with a small digital camera but it should serve as a rough guide as to how things should be looking if you have adjusted the secondary correctly.
Once the mirror is aligned correctly under the focuser lightly tighten the tilt screws.
You can now proceed to the second stage of the secondary alignment which is aligning the secondary to the primary mirror.
| Collimation Step 3 – The Secondary Mirror/Primary Mirror Alignment |
Aligning the secondary mirror to the primary is easily the hardest task. Still using the collimation cap in the focuser you now align the secondary using its tilt adjusters and occasionally a slight amount of rotation on its main centre screw ( you may need to loosen the screw tightly and twist the secondary mirror round by grasping its holder – DO NOT TOUCH THE MIRROR ITSELF ) to get the secondary centred onto the primary. This process is covered in the pictures below.
First remove the coloured card and the white ‘baffle’ card in the telescope tube. Now look into the collimation cap and using the tilt screws get all of the primary mirrors retaining clips into view and at the edge of the secondary mirror. IGNORE ALL OTHER VISUAL INFORMATION ! All you are trying to do at this stage is get the secondary mirror centred on the primary mirror.
 This diagram shows the classic view of the mirror clips showing in the secondary mirror which are equally spaced and equally proud. Not all scopes will have three mirror clips – larger scopes maye have 6 or even eight. It may be that to achieve this view the tilt screws alone may not be enough and you may have to apply a small amount of rotation to the secondary mirror by slackening slightly the centre screw and applying a small amount of rotation to the mirror. Don’t worry about this as it may just show that your visual check was ‘off’ by a small amount.
In the diagram above there is a circle marked in yellow. This is the likely extent of your view if you are using a Cheshire eyepiece at this stage. I personally prefer a collimation cap which provides a slightly wider view of the secondary.
 This photograph shows what the actual view should be like at this stage of the process. Note the three mirror clips are all visible and are all equally close to the edge of the secondary mirror and the secondary is showing round and centred to the focuser tube ( the dark area at the edges of the picture) You may need to move your focuser in or out to achieve a good view but the image should be very similar to this photograph.
When all three clips are in view (and some scopes may have more clips) and shown at the edge of the secondary mirror with equal space around them this part of the collimation process is complete. Tighten down the tilt adjusters and take a final check.
The tilt adjusters can be set quite tight but be careful not to apply too much force and bend the spider vanes. As with the previous step its best to have the telescope horizontal during this step in case an Allen key is dropped into the tube.
Once the primary mirror clips are shown reflected in the secondary and the tilt screws have been tightened take a final check using the procedures in stage 2 that the secondary still shows as centred and circular.
If the secondary has shifted then you will need to realign using the procedures in stage 2 and then run through the procedures in stage 3 again. Its not uncommon for some rotation error to creep into the mirrors position while the tilt screws are adjusted. Take your time, be patient and continuously go back over your work and make sure all is well at each stage before continuing.
When you are satisfied that the mirror is centred and true as in step 2 AND all the mirror clips from the primary are in view as per step 3 you can now tighten the adjusters down, these need to be firm but do not apply so much force that you strip threads. A standard Allen key is best rather than an Allen headed screwdriver or a multi tool as it will limit the force you can apply. Take care also that you do not apply too much force and cause the spider vanes to bend.
Now you should check using a small mirror that the secondary adjustment is more or less equal and that no one screw is causing the mirror to be canted too far over as per the diagrams below.
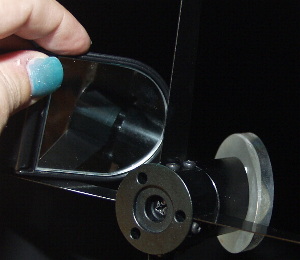 Checking the secondary mirror tilt |
 Secondary Mirror close to square on its holder. There will be some small tilt shown on close inspection – OK |
 Secondary mirror excessively tilted. Retry alignment and start again |
| Collimation Step 4 – Aligning the Primary Mirror |
The final step in collimation is the primary mirror. This is relatively simple to carry out and the cause of most ‘in the field’ collimation errors.
At the rear of the telescope you will find three pairs of screws. These are the primary mirror tilt adjusters and their respective lock nuts.
Note: Some telescope manufacturers (Sky-Watcher for instance) cover the collimation adjusters with a steel plate. This will need to be removed before collimation can proceed.
 Removing the primary mirror |
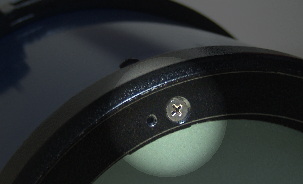 Collimation screws. |
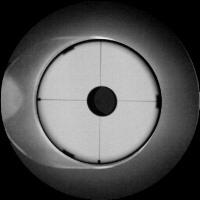
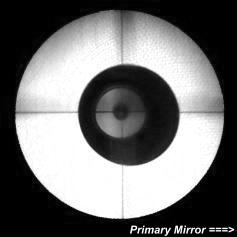
For this stage you will need the Cheshire collimator. Insert this into the focuser and take a look through the collimator. You should see a pattern similar to the one shown below right – this is from a telescope that is in collimation.
 |
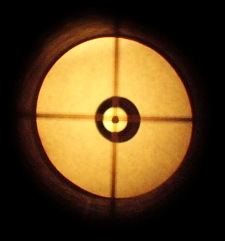 |
It may be that that the pattern is offset and will show the cross hairs as being adrift from the central circle created by the Primary Mirrors centre spot and that the centre spots are adrift. If this is so then you will need to adjust the primary mirror.
 Collimation error – the centre spots are |
 Close up of the central area of the |
If collimation of the primary mirror is required loosen the lock screws off and adjust the primary mirror using its adjuster screws until you see a pattern as per the diagrams and pictures below.
Take care when using the adjuster screws that you do not allow the mirror to come too far forward on adjustment as the screws may disengage and also take care that the collimation screws and lock screws aren’t tightened down to a point which may cause the primary mirror to become ‘pinched’ or distorted. They should be finger tight only.
Bear in mind the collimation pattern may be slightly different depending on the f ratio of your scope. For more information see below.
A note on spider vanes in the view…………
When collimating the spider vanes, apart from the inistial stage of making sure they are holding the secondary mirror central, are not relevant to the collimation procedure. Ignore them – you should only be looking at the Cheshires cross hairs and making sure that the cross hairs intersect the primary mirror centre spot.
Fast Slow Telescopes
You should note that fast scopes of f5 and above are less tolerant of collimation errors and they also show slightly offset collimation patterns. These are shown below as a guide.
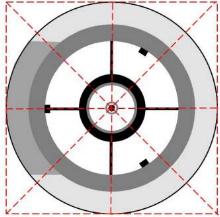 Slow scope collimation – |
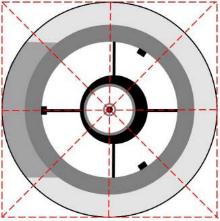 Fast scope (f5 and above ) |
|
|
Above illustrations courtesy of Jason Khadder |
||
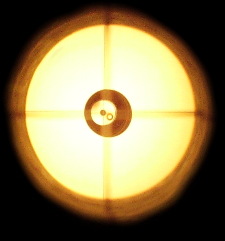
In the fast scope patterns above and below the circles are in fact concentric and true (ie. totally circular) but the offset of the secondary mirror creates an illusion that the reflection is elliptical and/or off centre. These differences are shown with diagram plus an actual photograph of a fast scope collimation view to give you an idea what the final view through the Cheshire should look like.
 This photograph shows what the actual view should be like at this stage of the process. Note the three mirror clips are all visible and are all equally close to the edge of the secondary mirror and the secondary is showing round and centred to the focuser tube ( the dark area at the edges of the picture) You may need to move your focuser in or out to achieve a good view but the image should be very similar to this photograph.
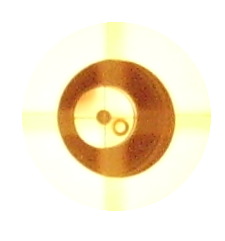
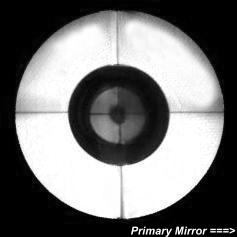 This is an actual photograph taken through a Cheshire and shows a near perfect collimation pattern for a fast (f5) Newtonian. It is in fact my own Sky-Watcher 200P Note that the centremost circle is made up of the primary mirrors centre ring and its associated reflection. The cross hairs exactly intersect the centre circle. Note also the offset typical of a fast Newtonian.
When collimation of the primary has been achieved and the Cheshire pattern is correct tighten down the locking nuts and recheck. Do not over-tighten the lock nuts. They should be firm but do not require massive amounts of pressure. I usually feel for them coming into contact with the mirror cell and then add a small amount of pressure.
Replace any protective plates and remove the Cheshire collimator.
When this step is completed and all of the alignment patterns shown in this guide are true then the telescope is collimated to within the limits of what you can achieve with a Cheshire and you should find the telescope is perfectly well collimated for use.
You may wish to carry out a ‘star test’ to verify this and/or to make any fine fine tuning adjustments. Star testing is simple enough to carry out and there is a section below which will explain this and show the most common problems.
So – get it as good as you can but do not overly worry if there is some small element which isn’t perfect. My own collimation via a Cheshire is always a little ‘off’ – star testing confirms the scope as being spot on so bear this in mind.
When adjusting your telescope bear this in mind and try not to become obsessed with having every element exactly perfect. Many things will ultimately upset the ‘perfect’ collimation. These include focuser ‘slop’ – this is the looseness of all but the very best quality focusers, slight imperfections in the shape of the secondary mirror, temperature variations and even the anglular position of the telescope.
Primary mirrors are quite heavy and most telescope tubes are quite light. As a result a telescope tube will flex in normal usage and this alone will upset collimation.
So – get it as good as you can but do not overly worry if there is some small element which isn’t perfect. My own collimation via a Cheshire is always a little ‘off’ – star testing confirms the scope as being spot on so bear this in mind.
| Star Testing Your Telescope |
When collimation is complete you may wish to carry out a star test which will confirm the collimation or show small errors which can be fine tuned out.
To star test you will need a bright star and good seeing conditions. Polaris is the best star to test on but almost any bright star will do. You will need your telescope to have cooled down to the ambient temperature and also to be away from obstructions such as houses which may cause air thermals.
Get the star centred in your view using a low power eyepiece. Now use a very high power eyepiece
( or the highest powered you have available) and defocus VERY slightly. You should see a classic Airey disk as shown in the pictures below. Ideally the Airey disk will be perfectly formed for both sides of the perfect focus (Extrafocus and Intrafocus) but in reality most telescopes wont do this perfectly owing to slack within the focus mechanism or atmospheric turbulence but you should see an Airey disk on at least one side of the perfect focus position.
The optimum magnification for star testing is at 25x per inch of aperture to start with and then fine tune at 50x per inch if seeing permits – you will need a very stable sky to get maximum magnification.
If you are not seeing an Airey disk this then there are several reasons why. This may be due to faulty collimation or other conditions which may not be correctable.
A list of common conditions and their corrective responses are shown in the tables below.
Be aware that in UK skies atmopsheric turbulence will be very often the pattern you will see. Unfortunately the typical turbulence pattern is very similar to the pattern you will see with a badly damaged mirror. Unless you have reason to believe the mirror IS damaged then there is no need to panic.
Even a turbulent atmosphere pattern will allow you to see whether the circles are concentric or whether they are off centred and non-concentric.
 |
Collimation perfect. Airey disk shows neat concentric circles. The innermost are dark due to the telescopes central obstruction caused by the secondary mirror. |
 |
Collimation is out of adjustment – Results such as these suggest the primary mirror is not well aligned. This is simple to correct in the field by adjusting the primary mirror collimation screws. Small adjustments only are needed. |
 |
Atmospheric turbulence – The air around the telescope and in its line of sight is being disrupted by rising heat or by higher altitude turbulence. You cannot star test with this present. |
 |
Pinched Mirror – this is the classic ‘heart’ shape indicating the primary mirror has become stressed. Initially check that the collimation adjusters are not over tight. If the problem persists you will need to remove the primary mirror cell and make sure the clips holding the mirror to the cell have not been over tightened. Another common cause of ‘pinching’ is often over tight tube rings. |
 |
Tube currents – the telescope has not cooled sufficiently to the outside air temperature. Allow the telescope more time to cool down. |
 |
Astigmatism can be caused by poor collimation but also by poor quality optics. Secondary mirrors which are not flat either because of bad collimation or bad polishing are typical causes. |
 |
Usually caused by incorrect figuring of the primary mirror. This cannot be corrected by the user. It indicates faulty optics in the mirrors design or production. |
 |
These show typical patterns for mirrors with poor optical surfaces. This may be caused by roughness of the mirror caused by poor polishing or damage from poor cleaning. This is not correctable. |
2017-10-04 14:00:41